Drumroll please… We’re bringing you fresh news about our DAM features release. Grab your coffee, tea, matcha — or anything else you might need — and let’s explore this major update in Ergonode PIM.
For those eager to try the new features on their own, here’s what’s new in the Advanced DAM release. This update introduces several major improvements to how media is managed in Ergonode PIM:
- A new media management panel in Resources → Media
- The ability to create attributes for media files
- Filtering and Flat Mode for faster asset search
- Batch actions for media assets
- The Assign to products automation feature
- Media profiles for automated image transformation
Below is a dedicated product demo tour where we showcase all changes related to DAM.
Below you'll find a deep-dive into each feature.
First things first — what are the DAM features?
DAM, short for Digital Asset Management, refers to functions that allow e-commerce businesses to store and manage various files, such as images, videos, or PDFs.
While many PIM systems offer some functionality for handling media files, these capabilities are often limited to a few specific tasks.
The Advanced DAM update in Ergonode means you now get a full range of tools and components that turn the platform into a complete powerhouse for product data management — including all your assets such as images, PDF files, and more.
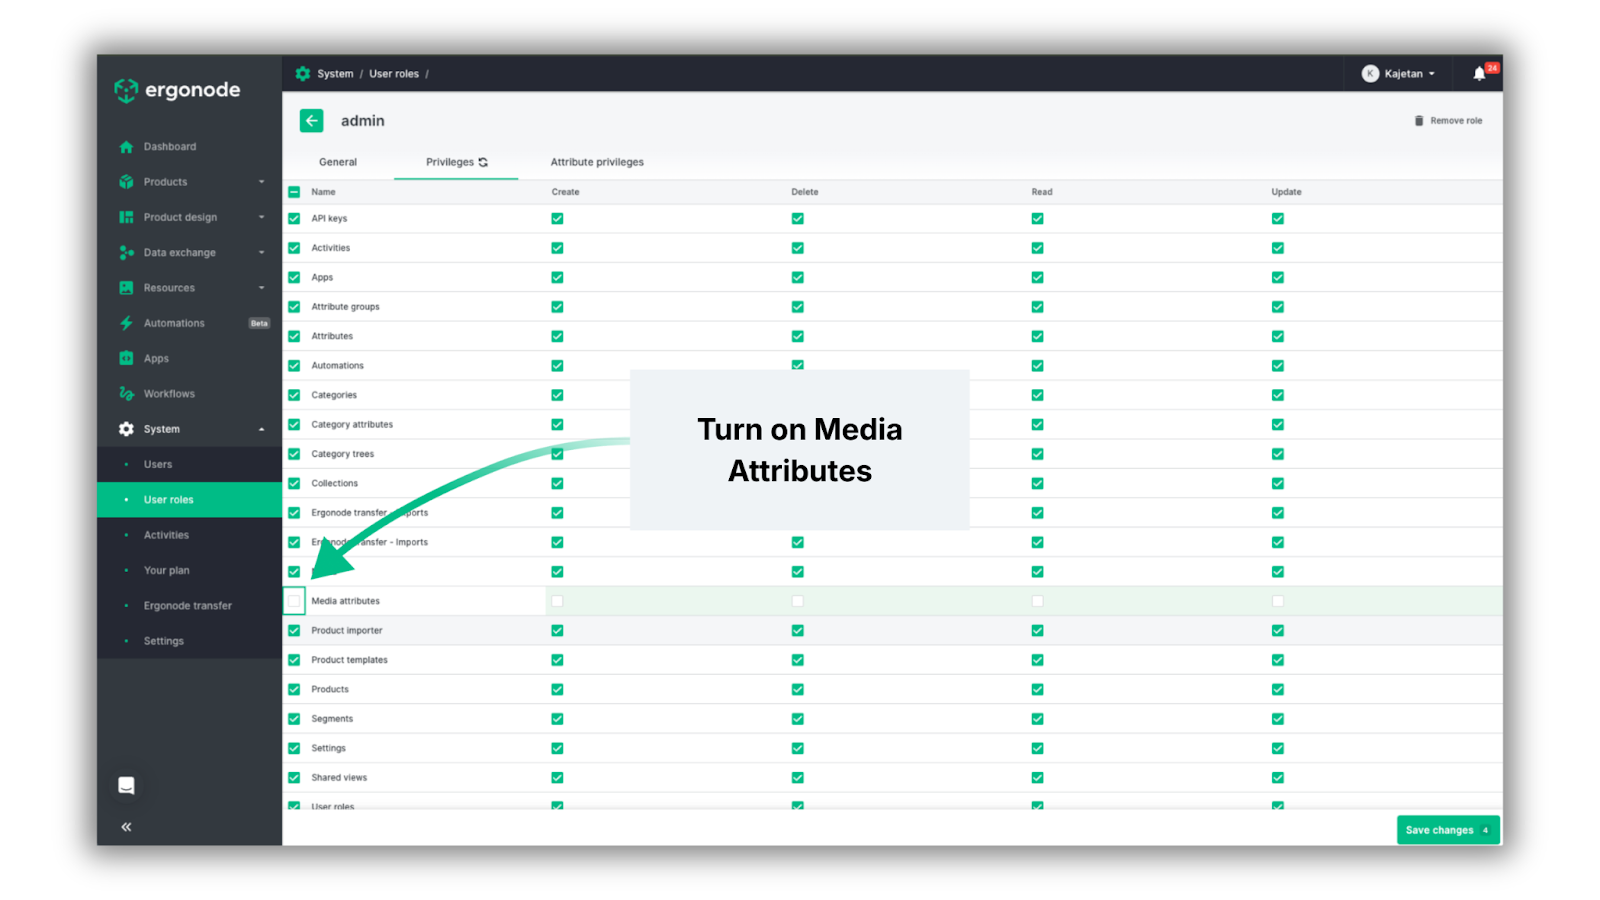
Before we go through the changes, make sure to turn on the DAM features. Head over to System → User roles, then choose the specific role and click on the pencil icon. To start using DAM features, please go to “Privileges” and tick the “Media attributes” box.
Tip: Most DAM features are available for Advance, Scale and Enterprise packages.
Now, let’s explore the changes.
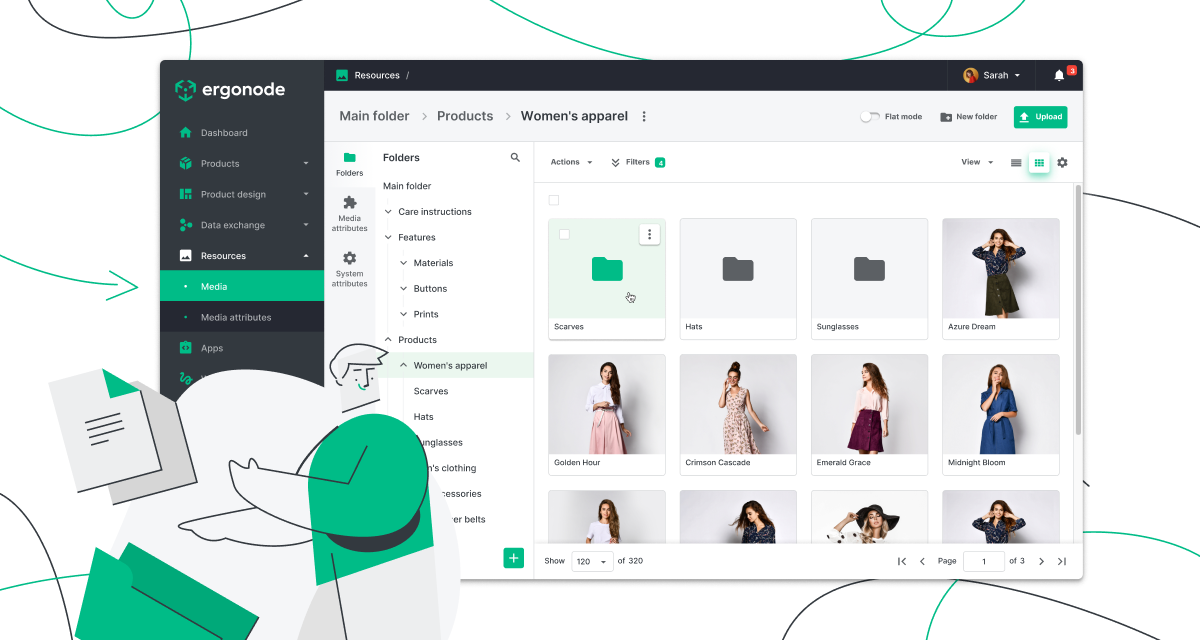
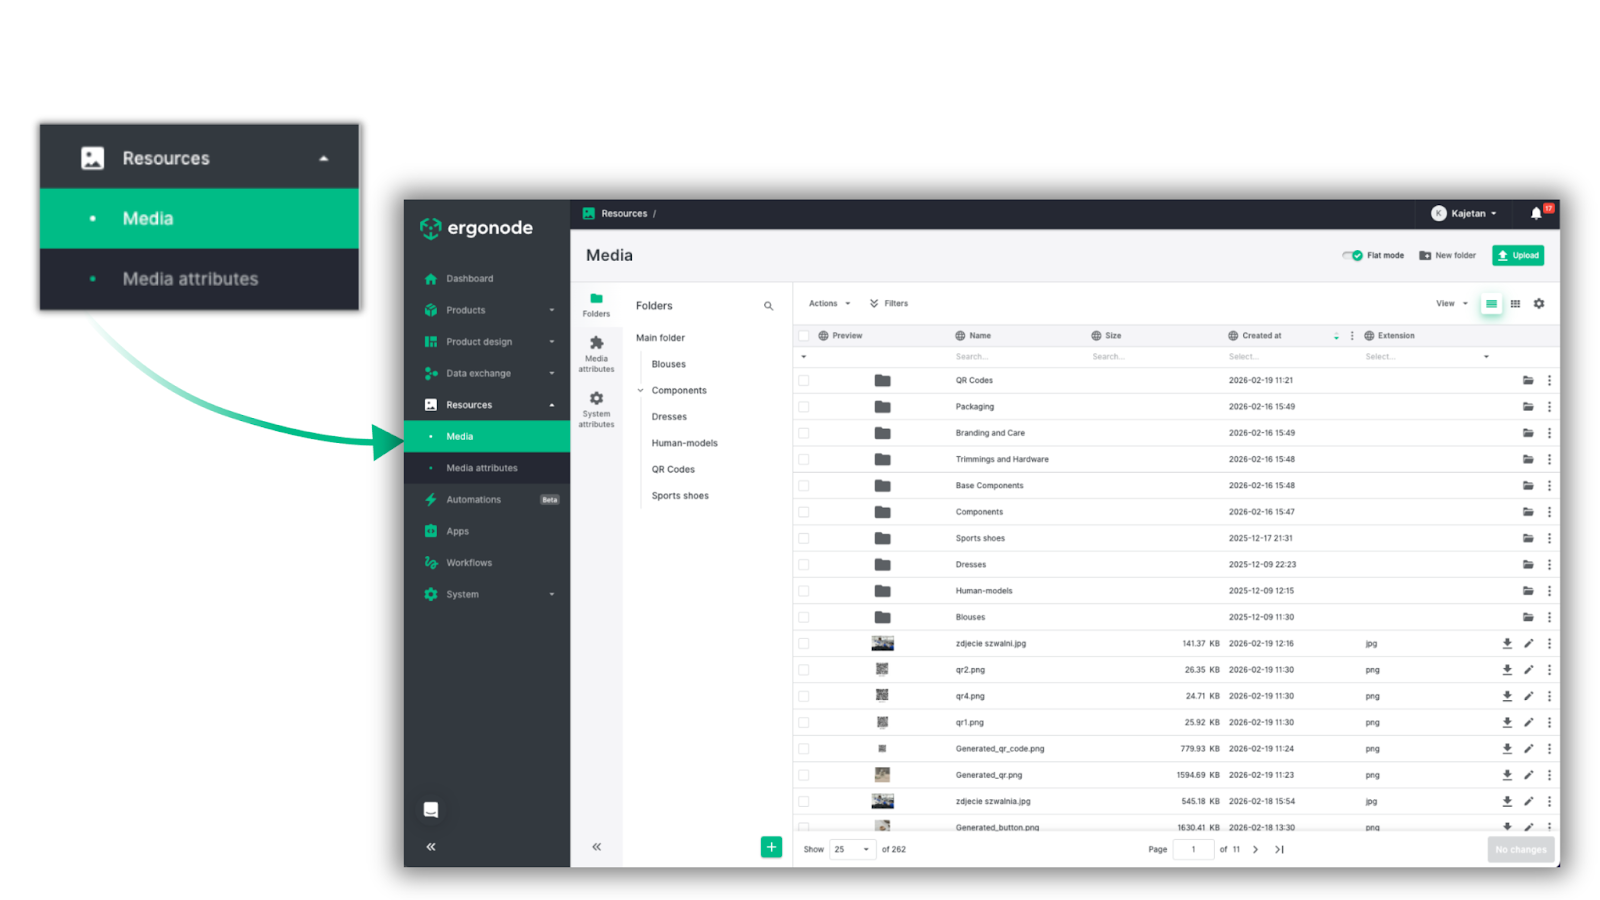
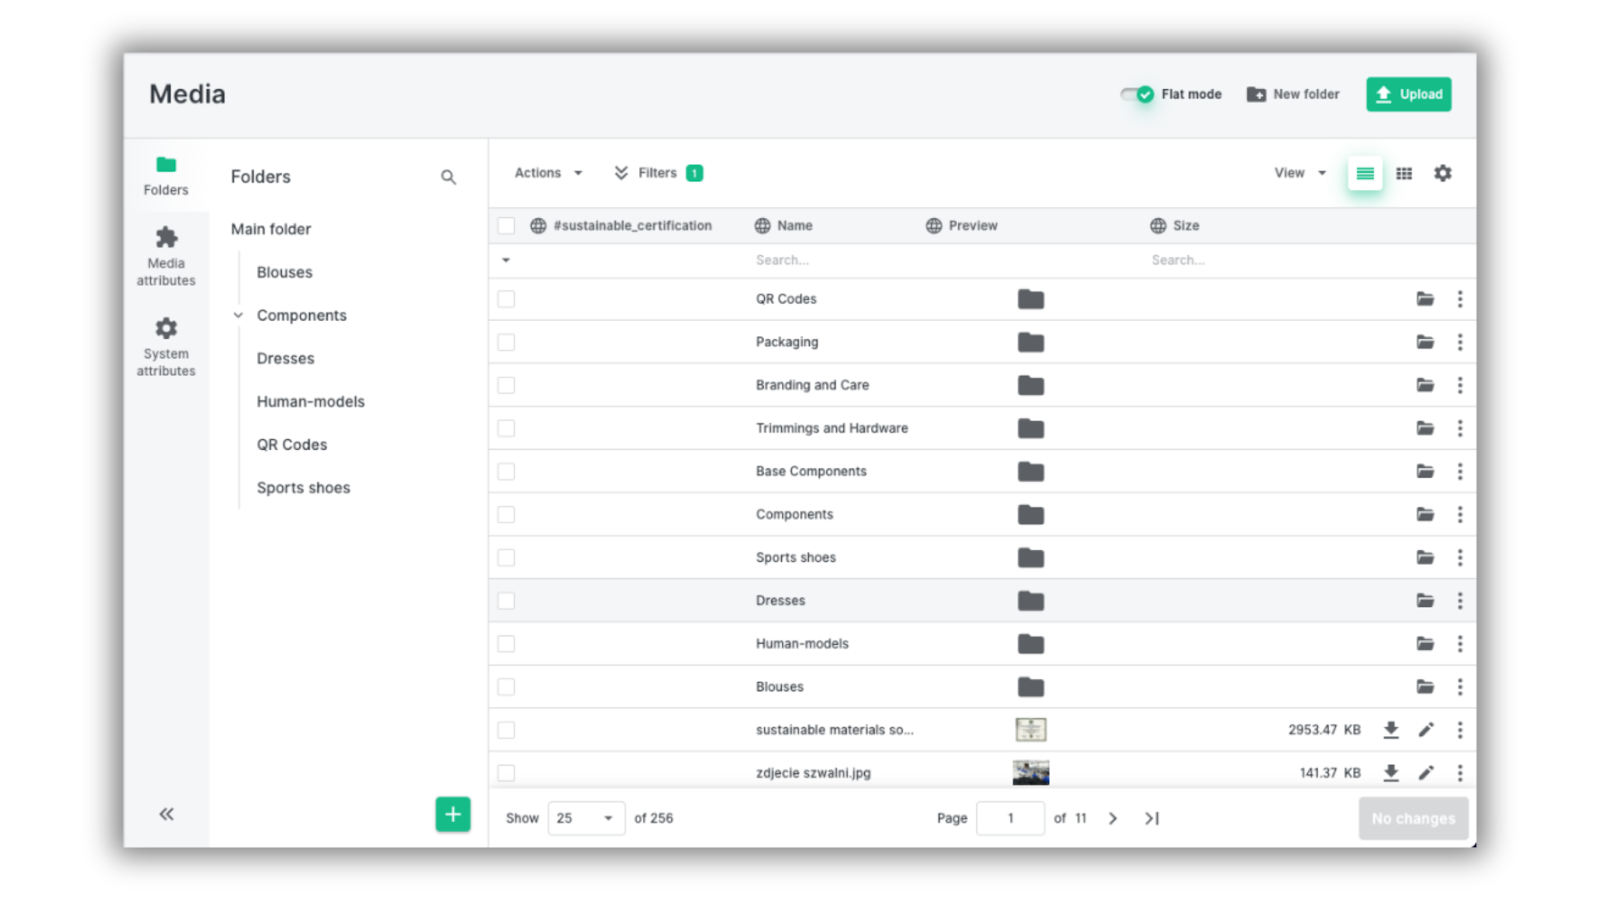
A brand new media management panel
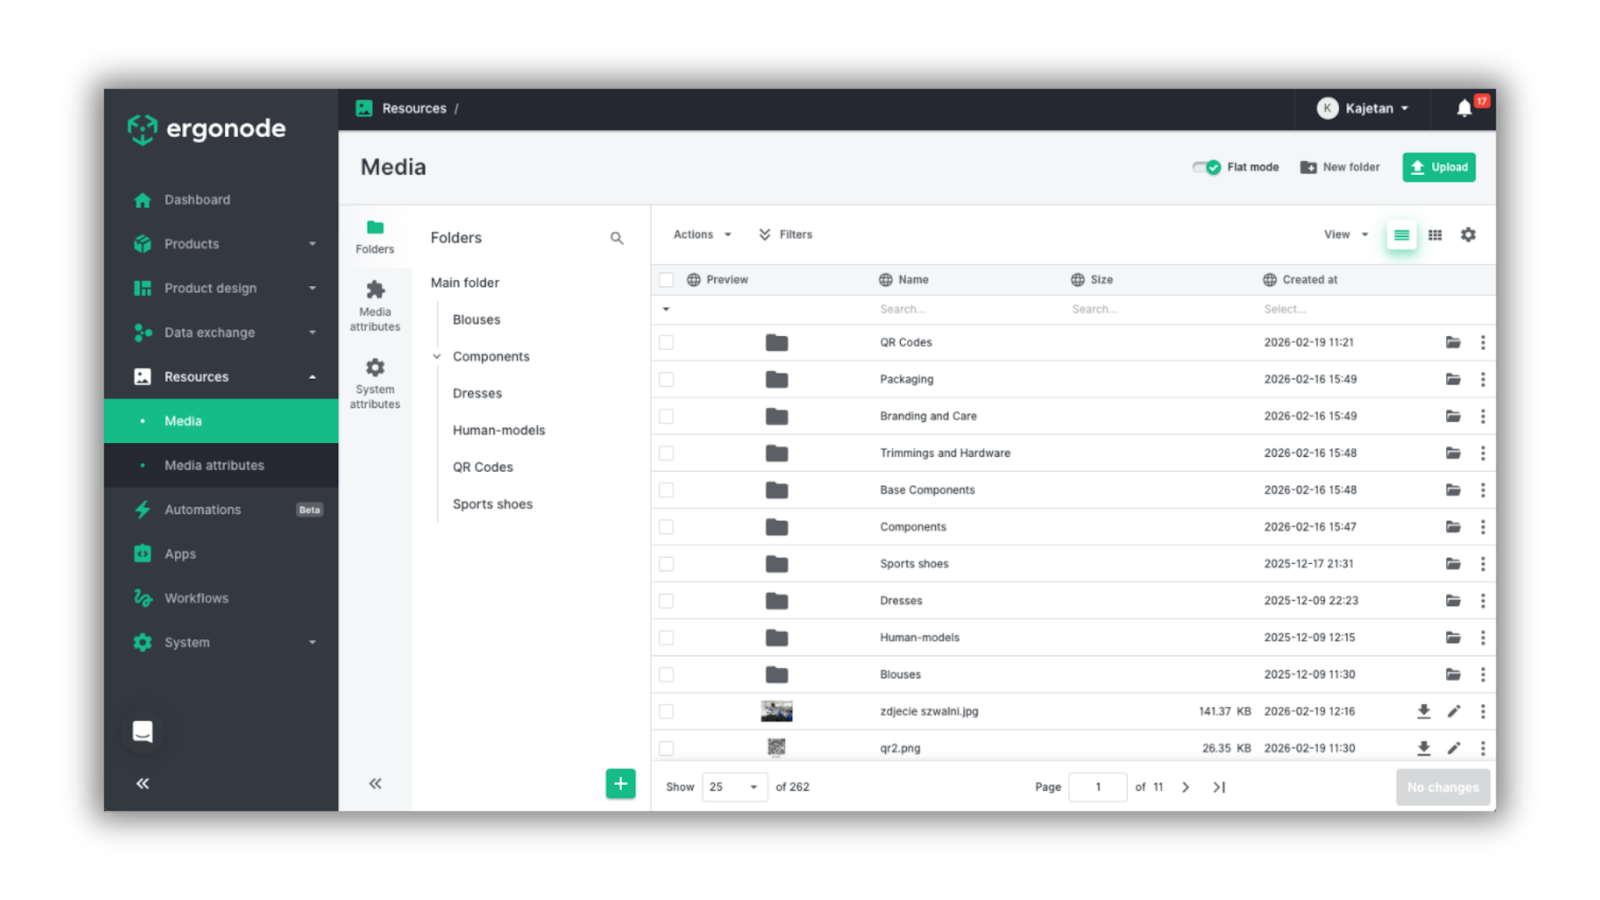
The first major change is the addition of a new tab: Resources → Media. Here you’ll find a dashboard that follows the same logic as the Catalog.
You can switch between two views: a table view and a tiles view.
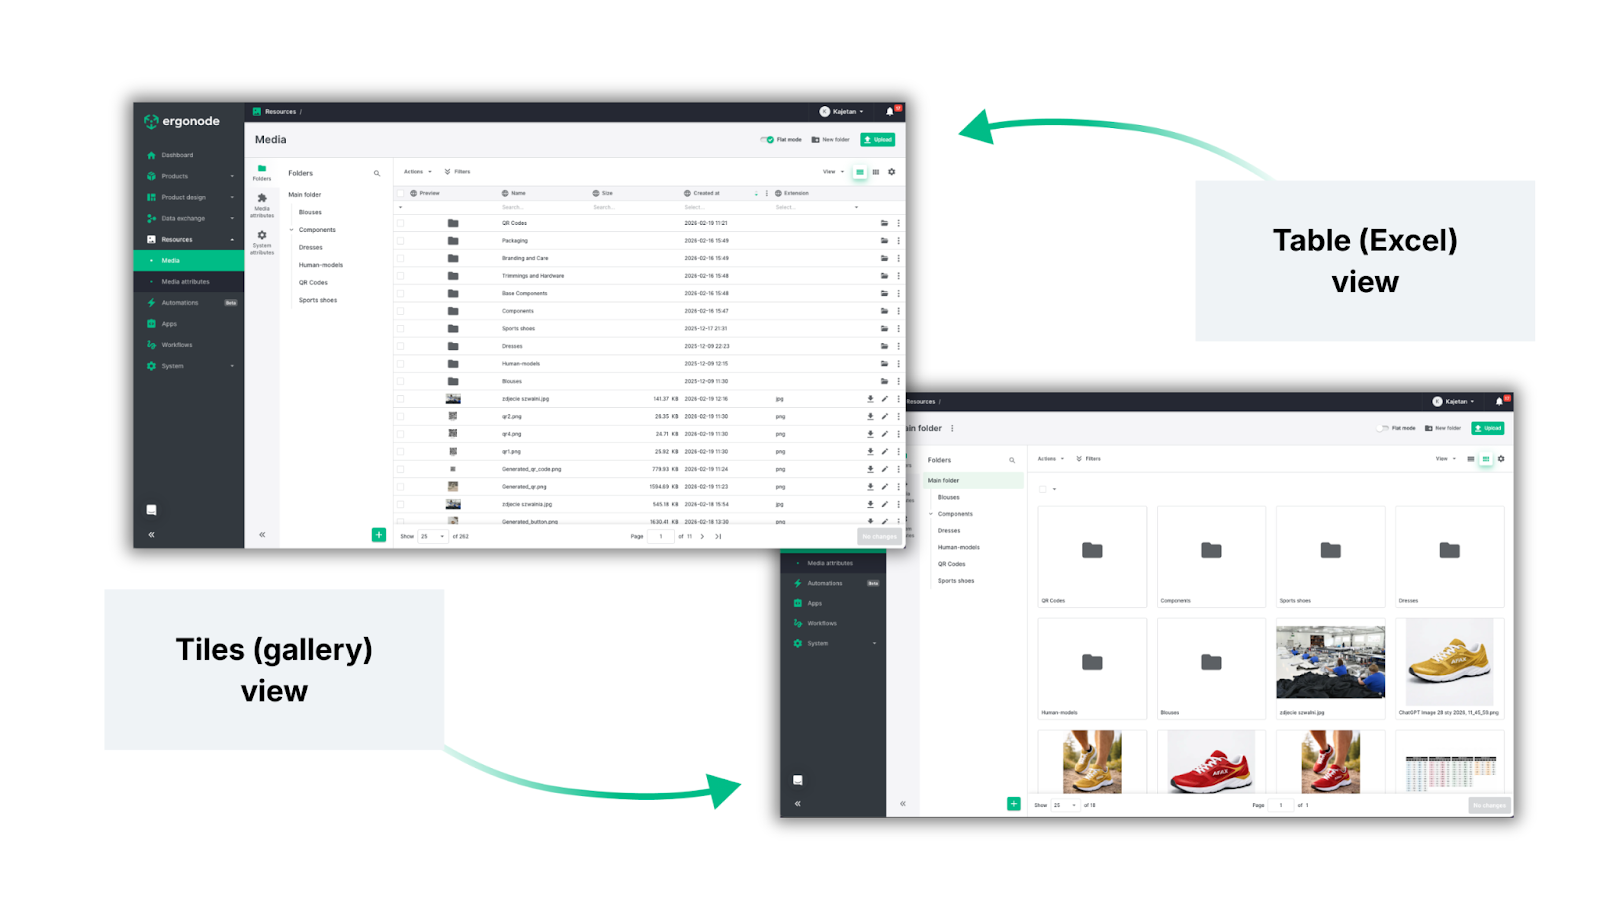
The listing view shows all your assets, where each row represents either a folder or a single media file. Using the left-hand navigation panel, you can easily move between folders — just like in storage tools such as Google Drive.
You’ll also notice the same column logic used in the Catalog.
Columns represent selected attributes, and you can show or hide them depending on what information you need in your view. As always, you can also save views, so you only see the data relevant to your tasks.
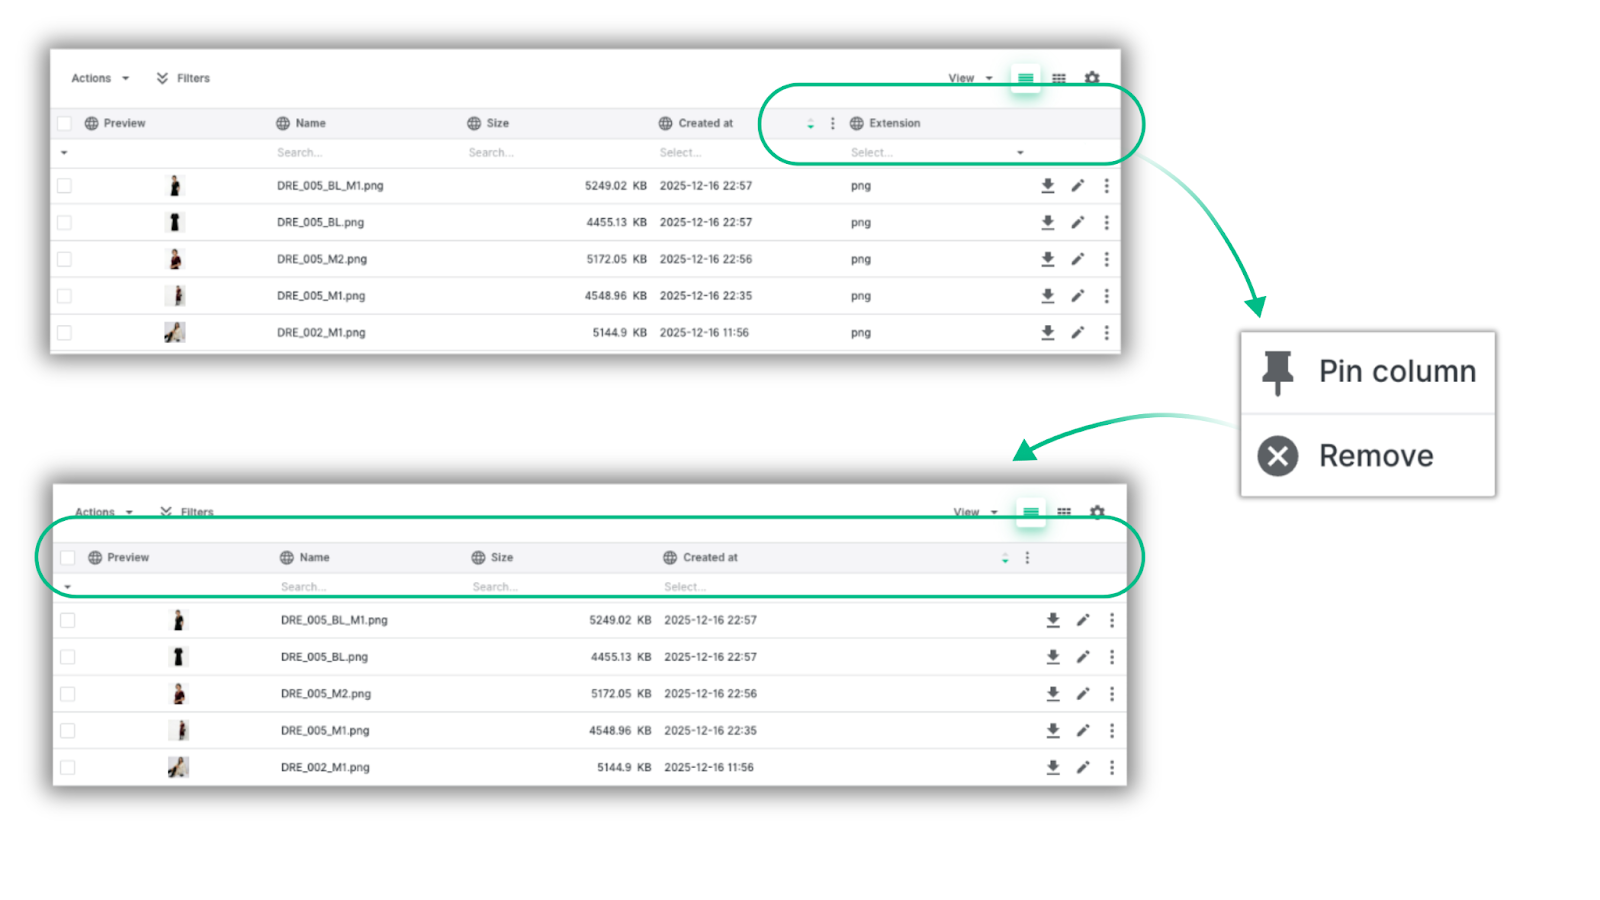
Tip: These views can be shared with other people in your organization. That way, each team member can have their own dedicated setup.
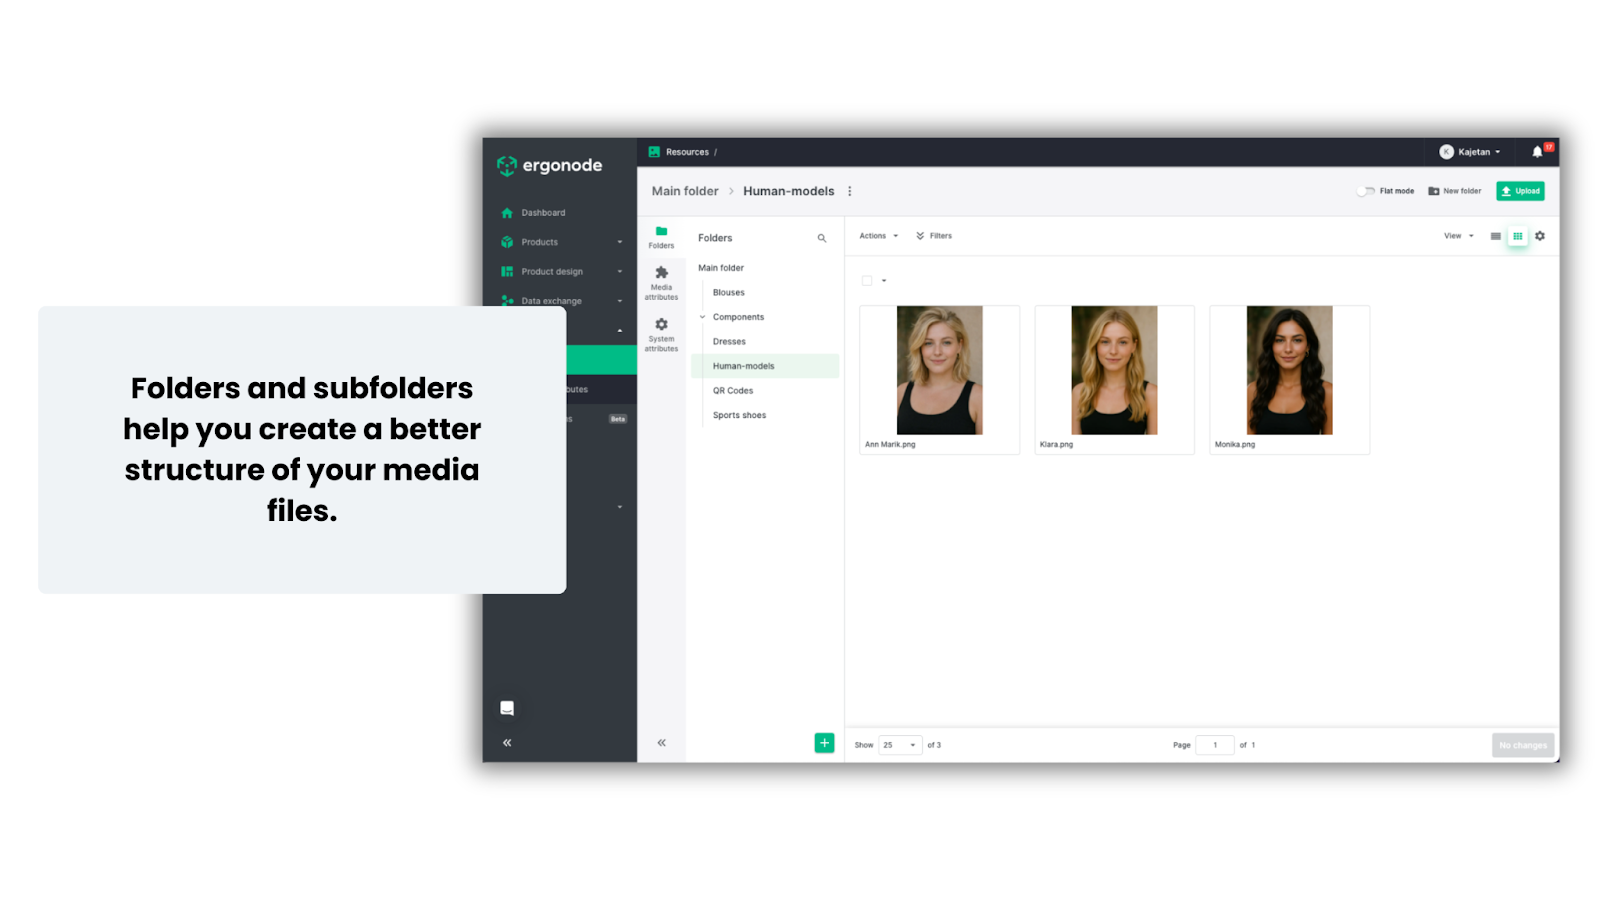
All files are organized into folders and subfolders, allowing you to keep your assets well structured across the product catalog.
Tip: Use folder and subfolder naming conventions to keep your files organized. For example, you could create a top-level folder called Models, with subfolders named after each person. Additional features — which we’ll show later in this article — allow you to enrich your assets with critical information, such as a model usage contract (attached as a file) and a rights expiration date (stored as a file attribute).
With this introduction out of the way, let’s move to one of the most important changes in enriching your data.
Custom attributes in media files
The core of product data management in a PIM system is the ability to add and edit attributes that describe your product.
However, many of these attributes are not purely descriptive — they are images or files that may also require their own metadata.
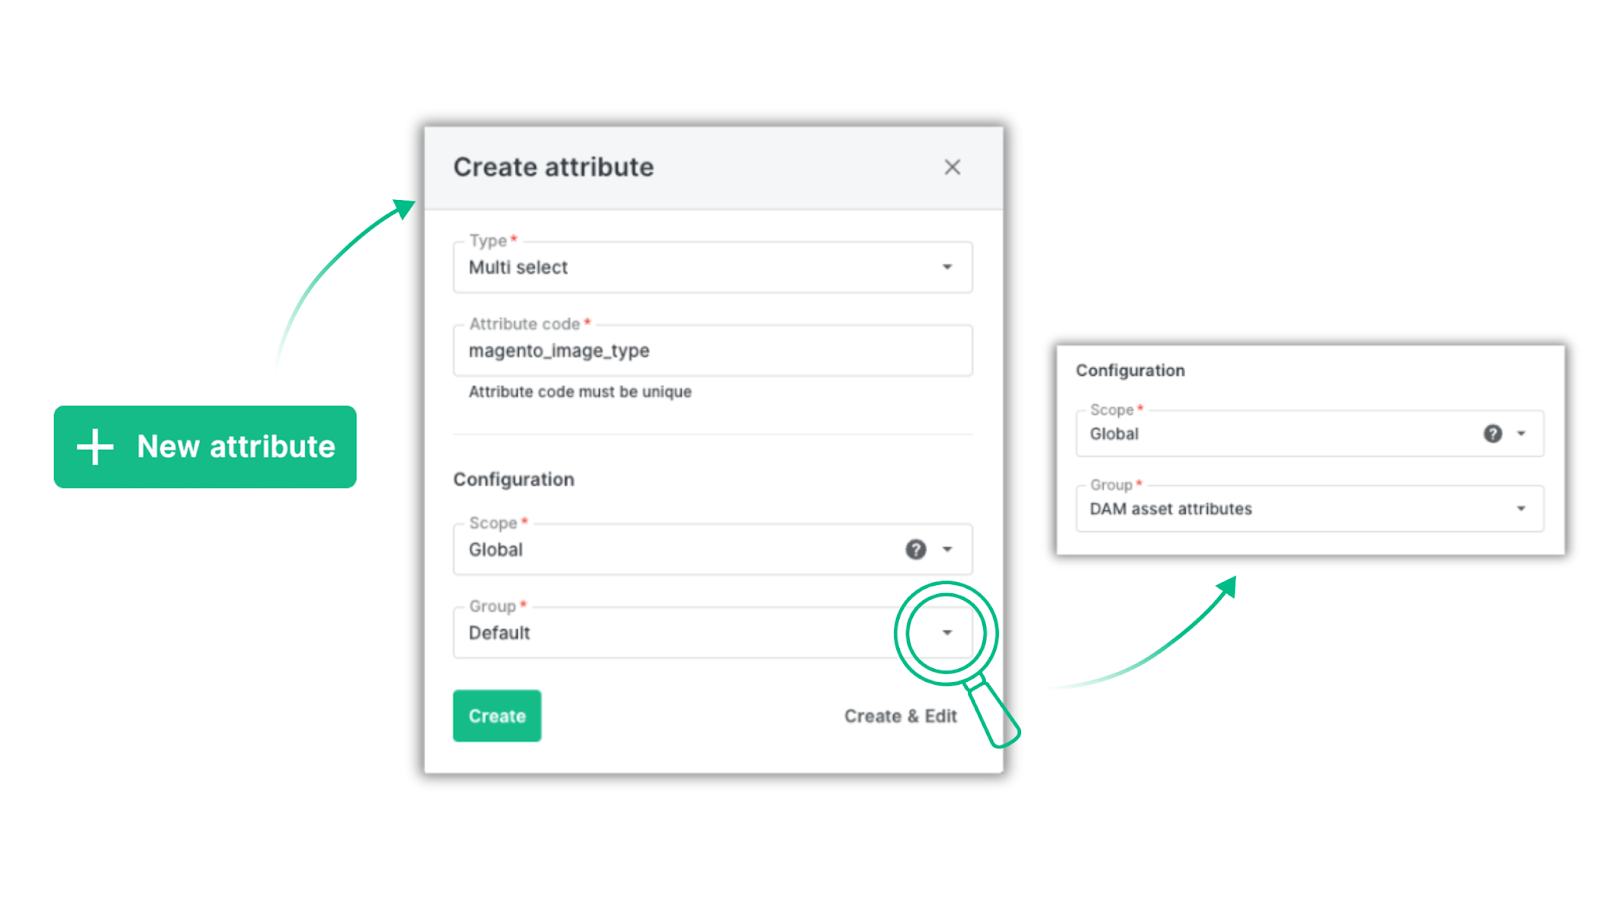
That’s why one of the most important updates is the ability to add attributes directly to media files in Ergonode PIM.
Media attributes are created in the same section as product attributes:
Product design → Attributes
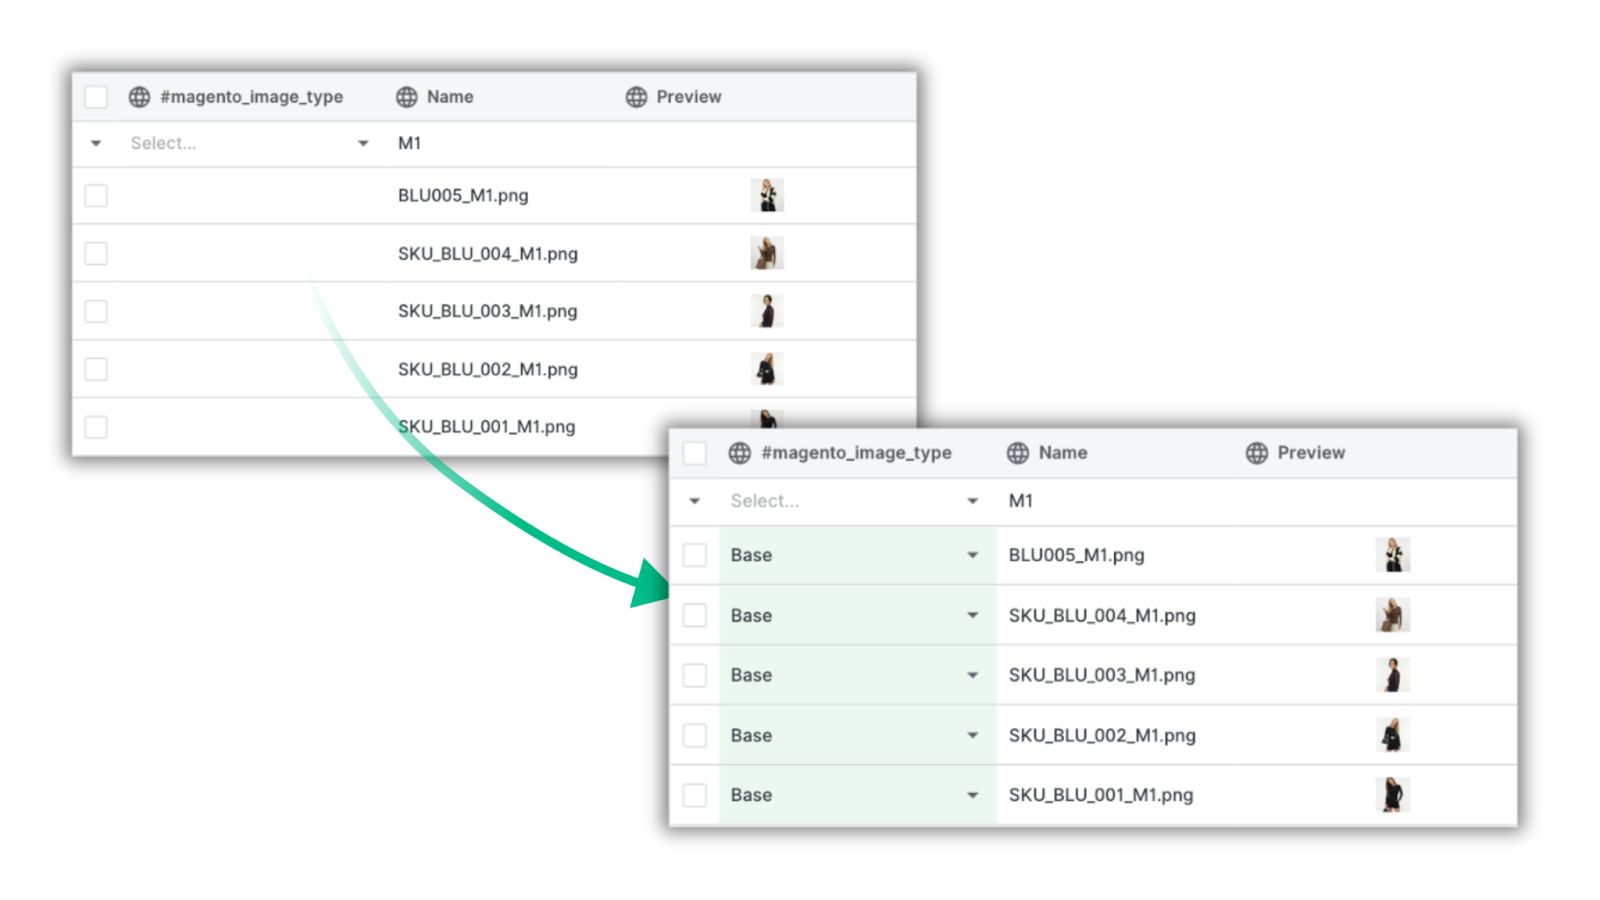
In our example, we created a test attribute — a select attribute called magento_image_type. We will use it to assign images from our database to three different types used in Magento.
Tip: We also created an attribute group called “DAM attributes” to bring all new attributes into one subset.
In the next step, go to Resources → Media attributes, search for the attribute you created, and add it to the list of available media attributes.
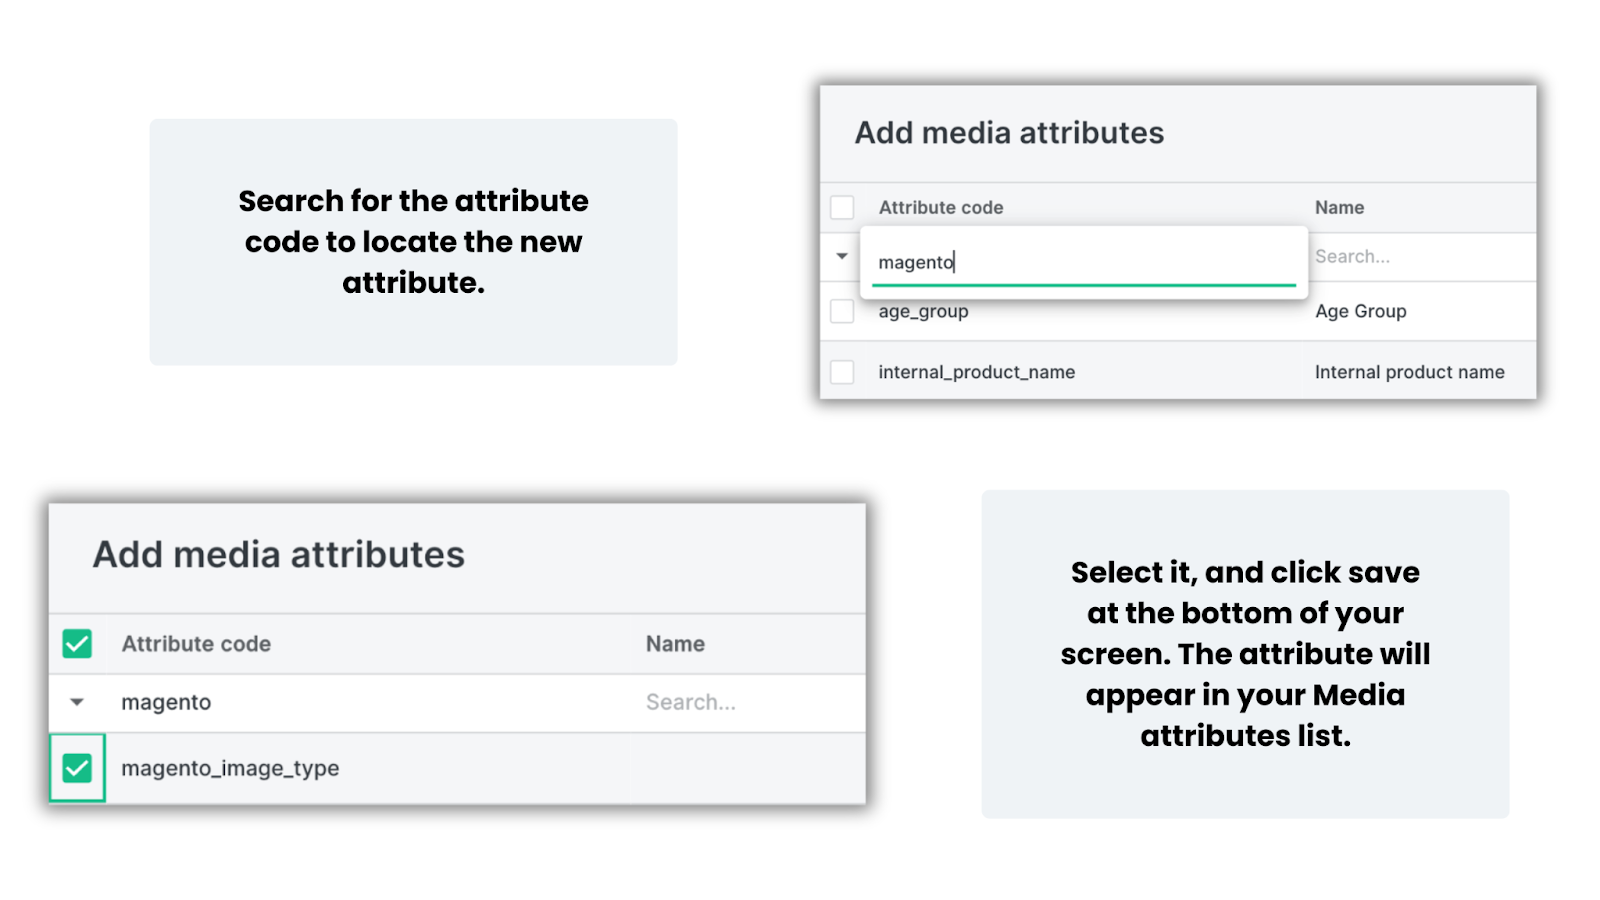
Now, when you open any media file, click the pencil icon and head to the Translations tab, where you’ll see the new attribute available.
Just like in our Catalog section, media attributes can be used to filter the list of images by dragging & dropping them into the list. The same mechanism of drag&drop allows you to add the media attribute as a column to your view. These attributes can also be edited directly in the Table view, too. We will explain all of this in more detail.
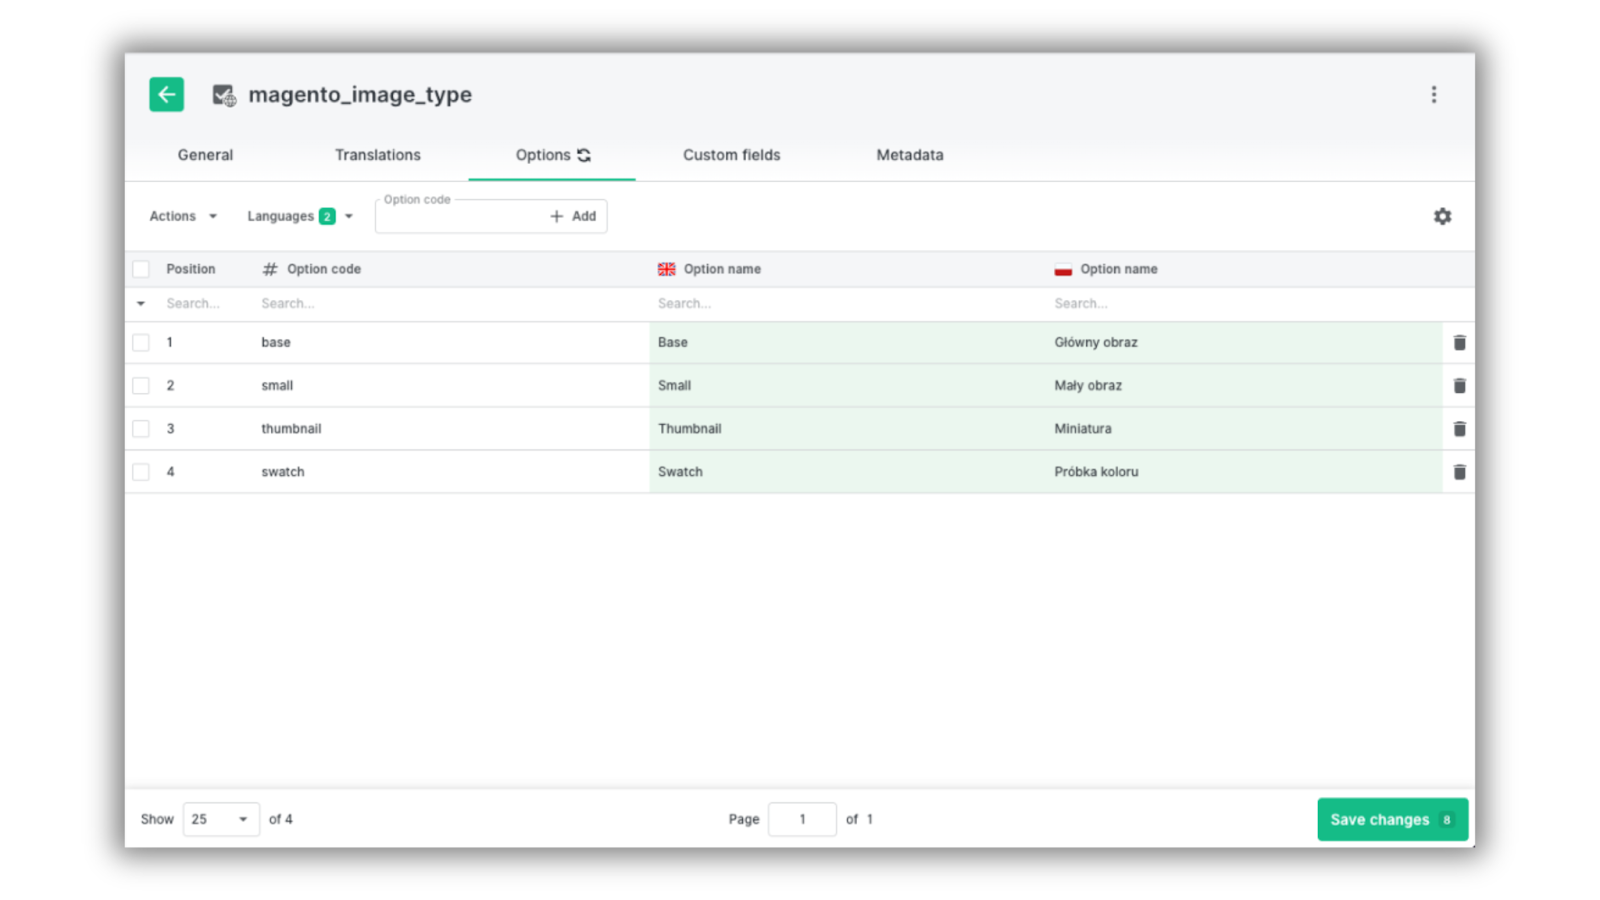
Let’s get back to our example. We added several options for the magento_image_type attribute: thumbnail, base, swatch and small. Now we can quickly assign these values to specific assets.
When data is transferred from Ergonode PIM to Magento, the images will automatically be assigned to their corresponding type in the e-commerce platform.
Here are some additional examples of how media attributes can be used:
- In industries such as lingerie, some images may include nudity, which may violate rules on certain marketplaces like Amazon. An attribute indicating whether an image complies with a specific sales channel can reduce the risk of products being delayed or removed.
- A B2B manufacturer of industrial components may need different types of images for the same product — from catalog packshots to instruction visuals. A select attribute called Purpose (e.g. marketing, technical, installation) ensures that the correct images are used in printed materials later.
- Images often have usage rights expiration dates. A date attribute allows you to track them at scale without manually checking each file.
- Certificates can also be stored as separate files. For example, in textiles you may want to attach a Global Organic Textile Standard (GOTS) certificate to all compliant products.
Filters in your media panel
Let’s head to Resources -> Media.
In addition to folders in the left navigation panel, you’ll also see Media attributes and System attributes icons.
Under Media attributes, you’ll find all attributes that were enabled earlier — including the Magento attribute from our example. We added it as a column, and opened the Blouses folder to assign our Magento image type to all assets.
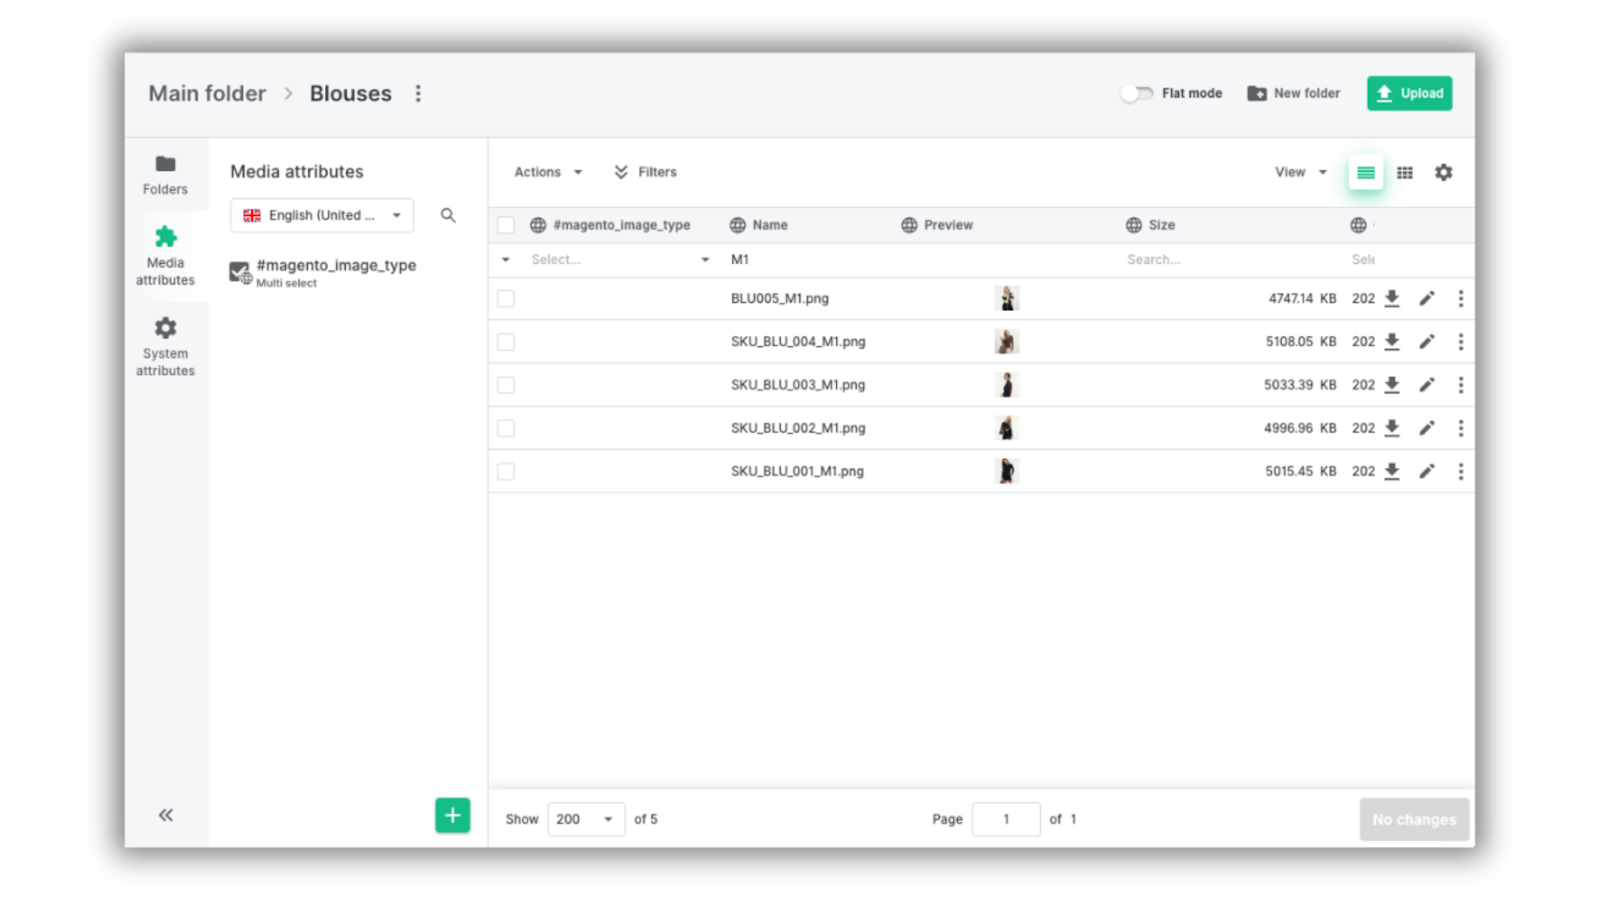
We followed the rule where “M1” in the product name indicates the “base” image option.
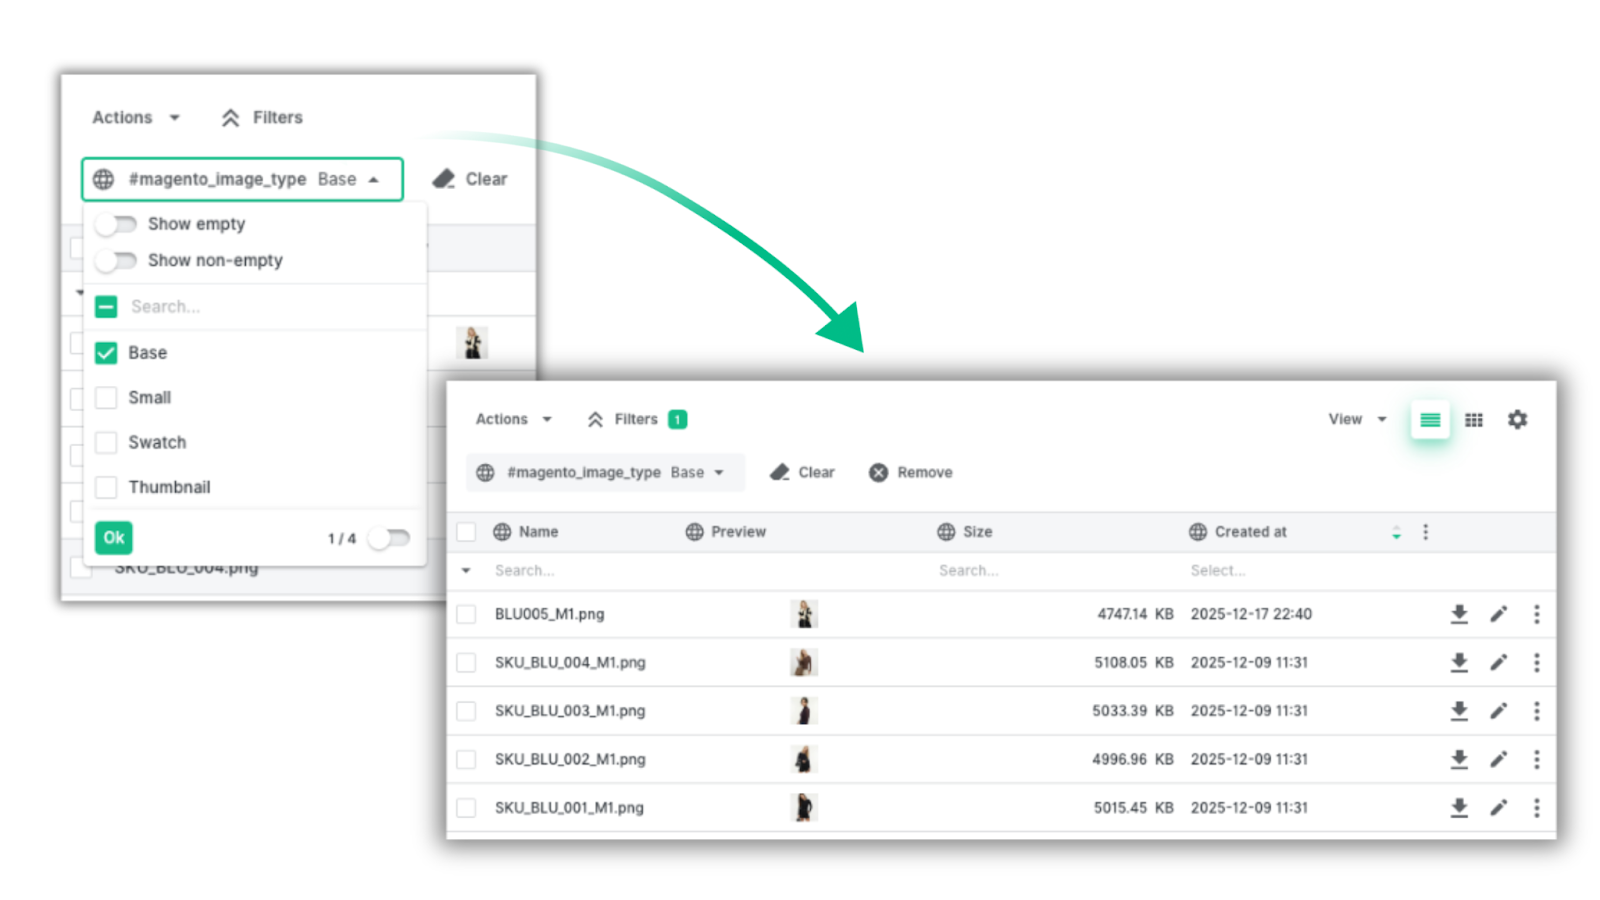
Tip: Think of attributes as media tags. Each attribute can be used as a filter, allowing you to quickly find the images you need to work on. For example, you could filter all images that have been assigned a “Base” option in our magento_image_type.
For example, if you store certificates as attributes attached to images, you can filter and quickly find files where the certificate is added or is missing.
Example: We created a Sustainable Materials Sourcing certificate, uploaded it to Ergonode PIM, and added it to our products as an attribute called "sustainable_certification". It's another image that we would like to attach to our media library.

Let's imagine that we added the certificate manually, and wanted to check if it had been correctly assigned to our blouses.
To do this, we used "sustainable_certification" as a filter and - to make it clearer - a column, too.
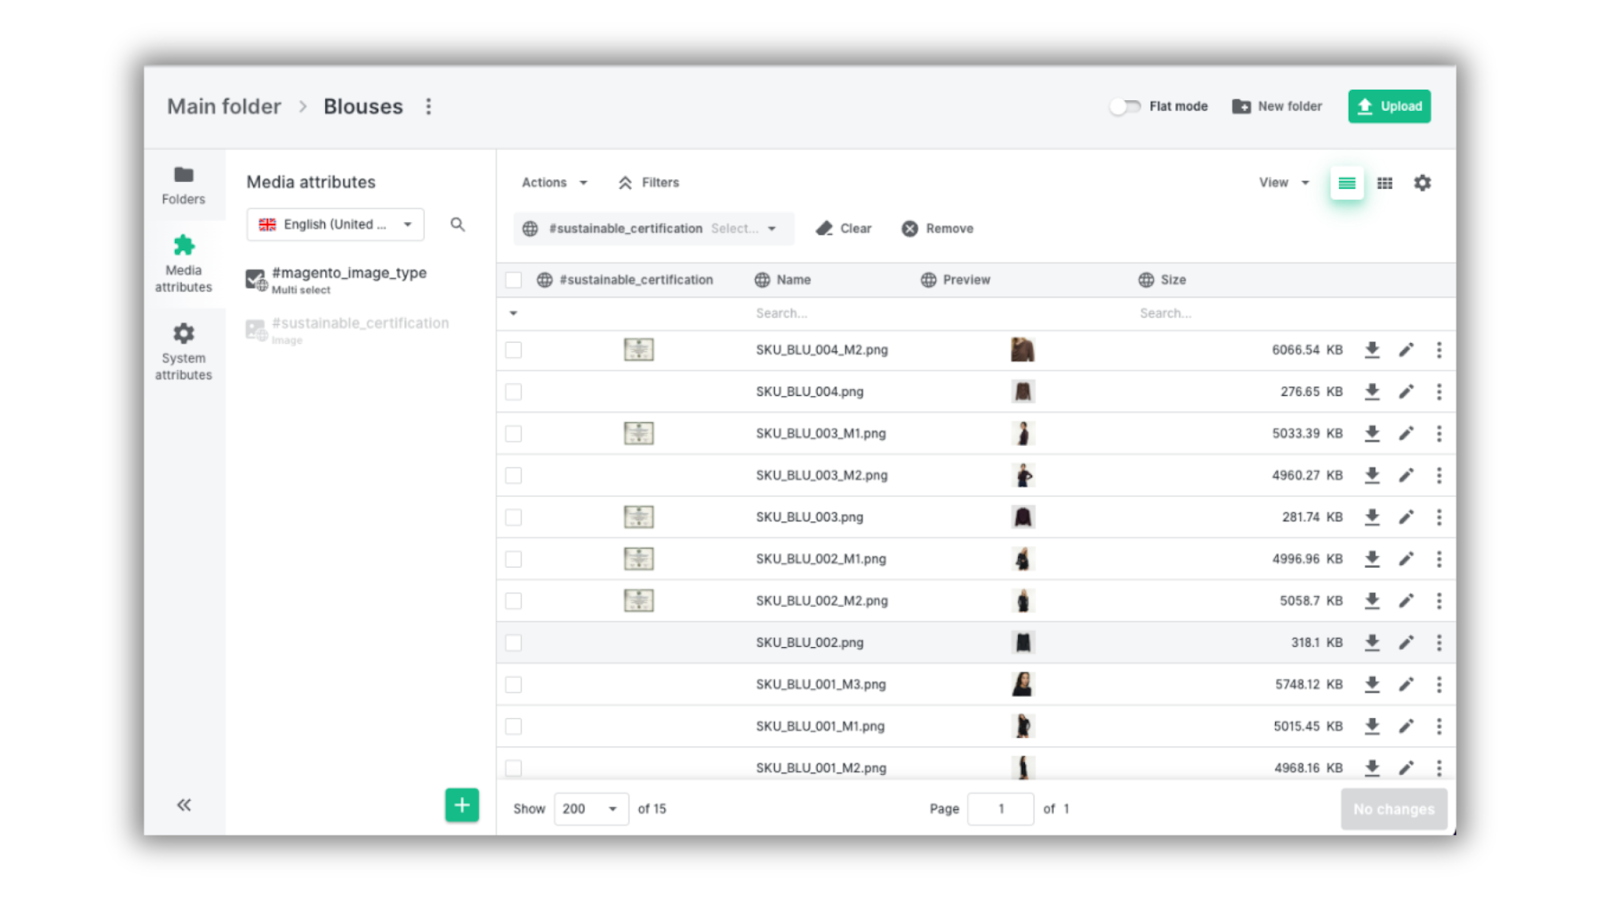
We now see clearly that some images are missing this attribute.
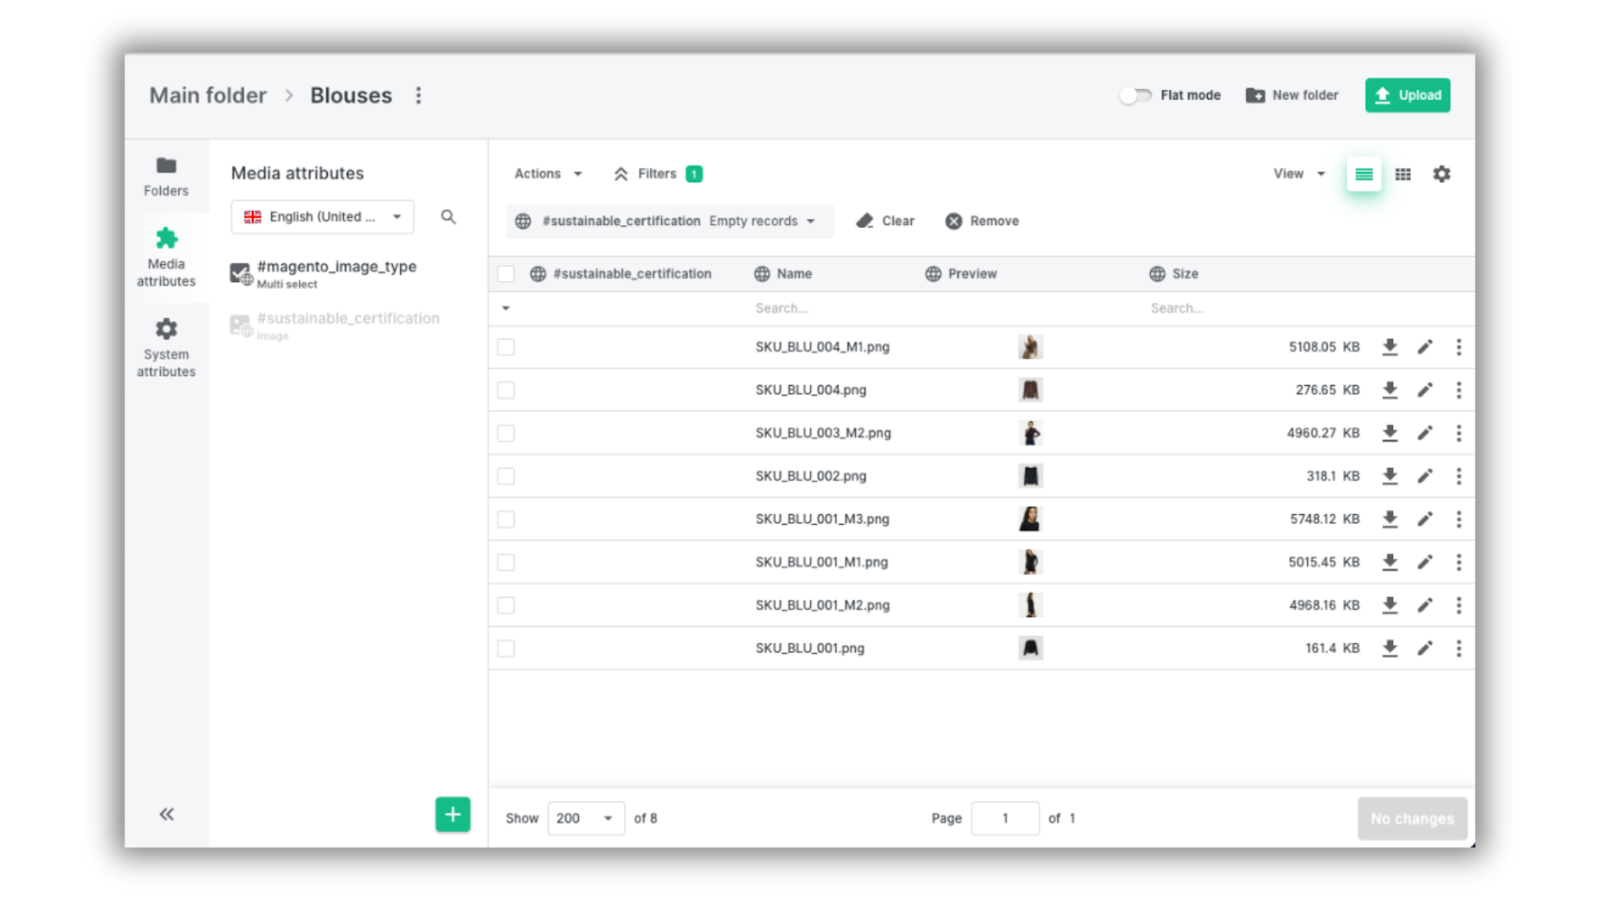
All that’s left to do is to filter “Show empty”, and we can assign the certificate to the files where the certificate was missing.
Another useful feature is Flat Mode, located in the top-right corner of the media panel.
When enabled, it shows all your folders in one view, including the subfolders. Using the example of the screenshot below, Flat Mode shows folders like “Trimmings and Hardware” which is a subfolder of “Components”.
Flat Mode also helps you locate files. Once you find the image you’re looking for, you can click “Go to location” to jump directly to the folder where the file is stored.
Tip: This action automatically disables Flat Mode. To enable it, use the toggle-on in the top right corner.
While filters help you browse through thousands of files and quickly locate assets, you’ll often want to make changes to many files at once. That's why we enabled batch actions for media, too.
Batch actions in media files
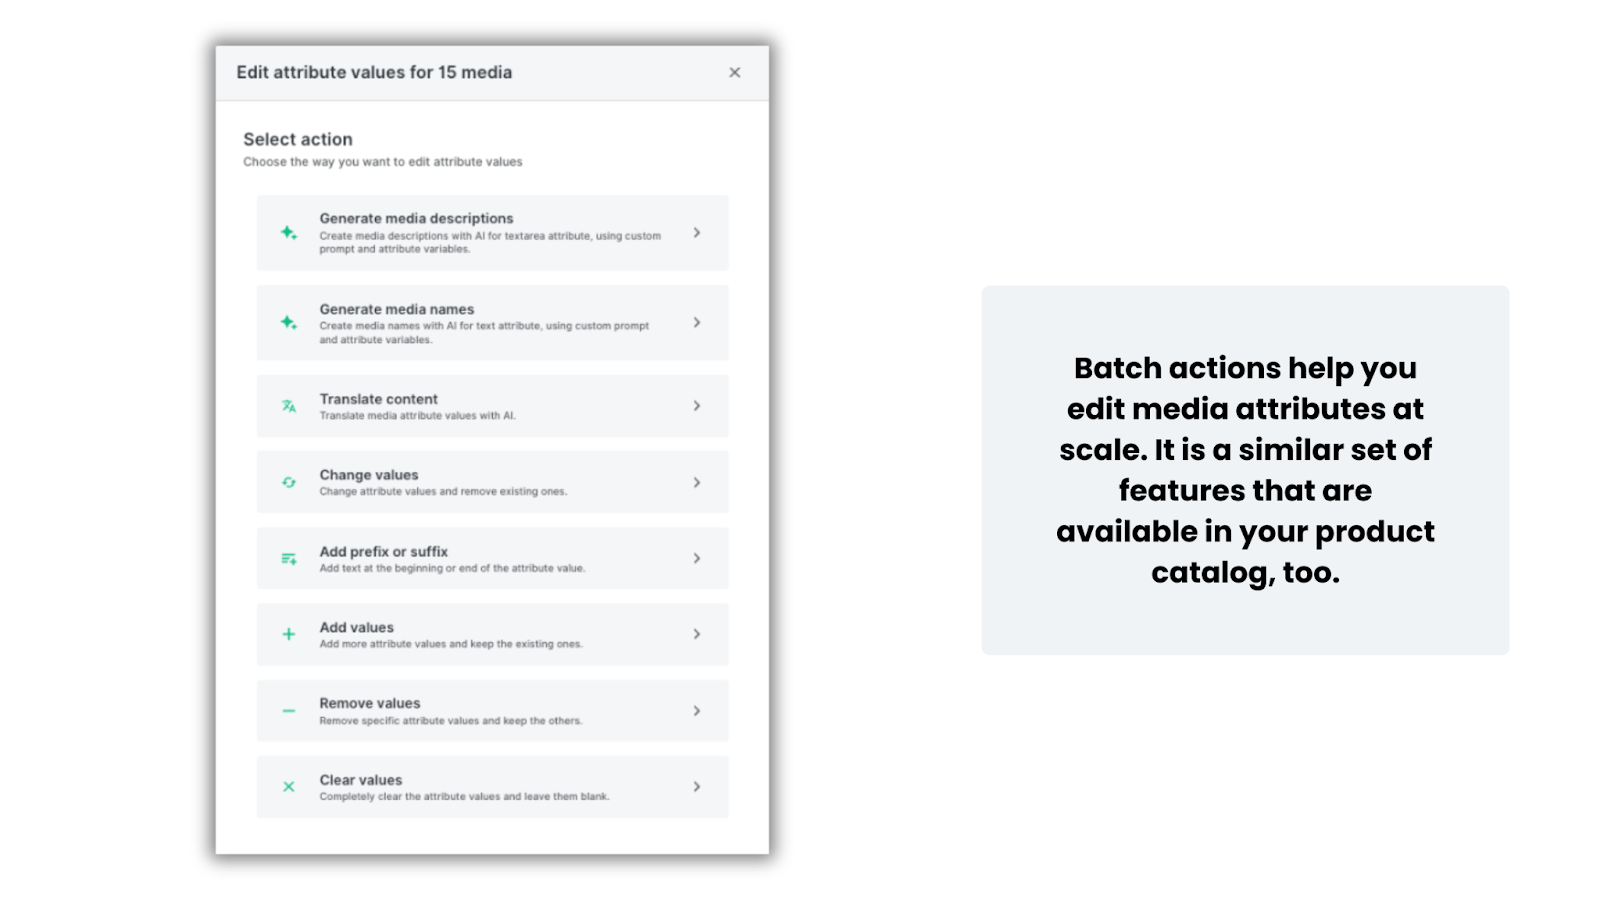
Assigning attributes to individual files is useful, but in many cases you’ll need to update dozens or even hundreds of images at once. Batch actions make this possible.
To get started, click “Edit media attributes" after you have selected the images that should be changed.
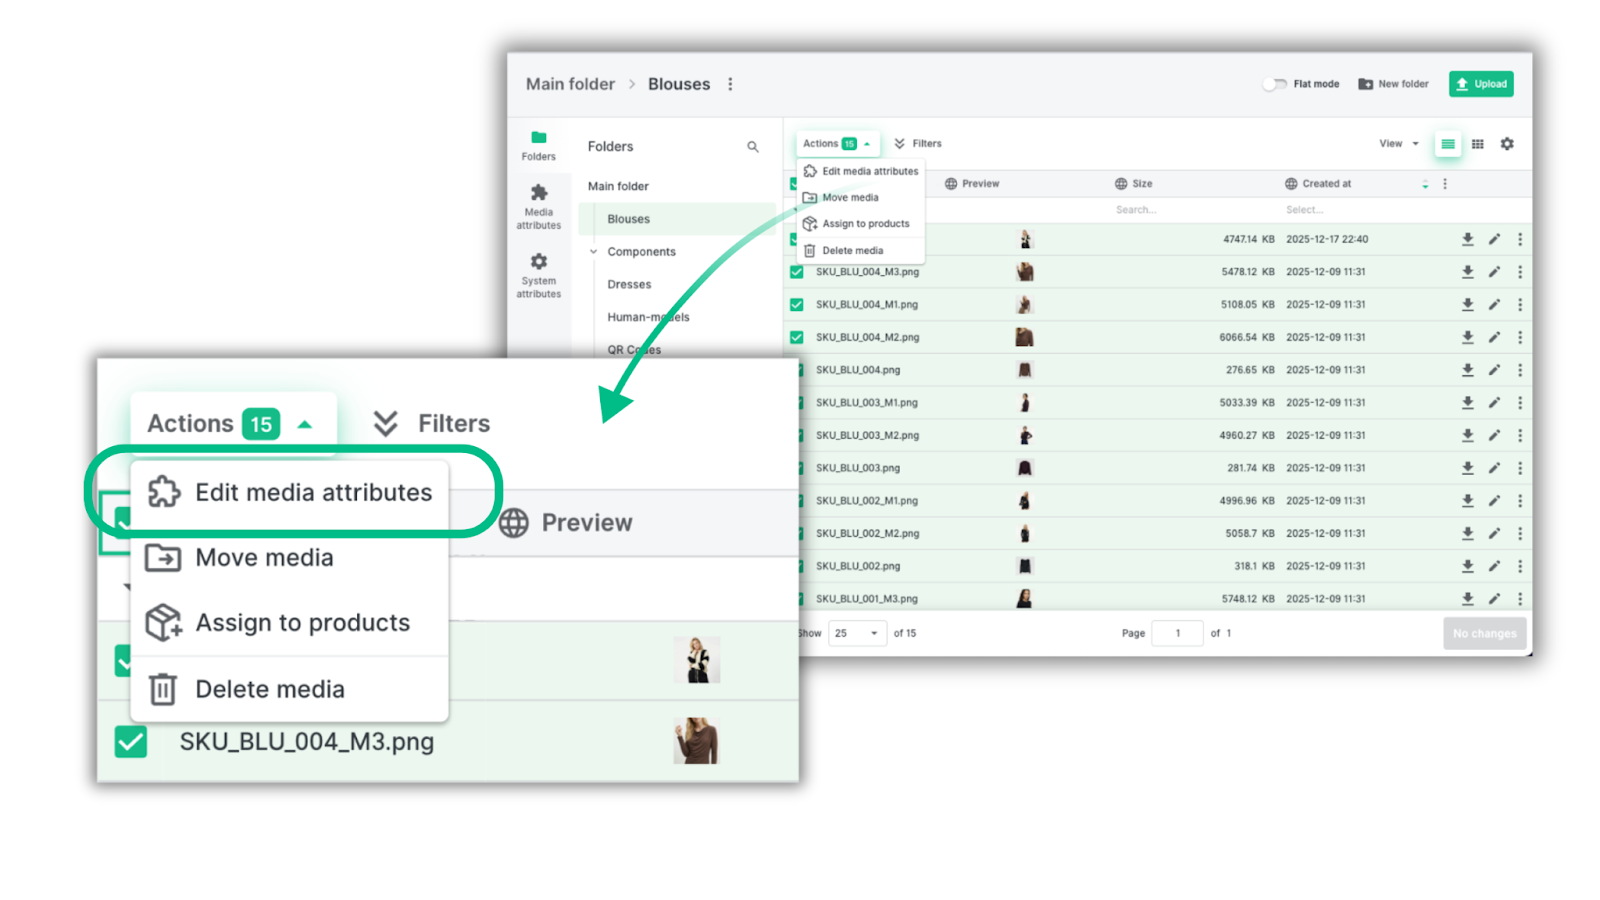
Just like in the Catalog, batch actions allow you to:
- Edit attributes and change or remove their values (for example, replacing an outdated certificate with a new one)
- Translate information stored in media attributes
- Add prefixes or suffixes
- Generate media descriptions and names
Tip: If you want to explore this functionality in detail, check out our dedicated Batch Actions guide.
Assign to products feature
One particularly useful batch action is Assign to products.
This feature allows you to connect multiple images to a product automatically based on part of its name or identifier. We will attach all fitting images from the media database to a product named BLU_001.
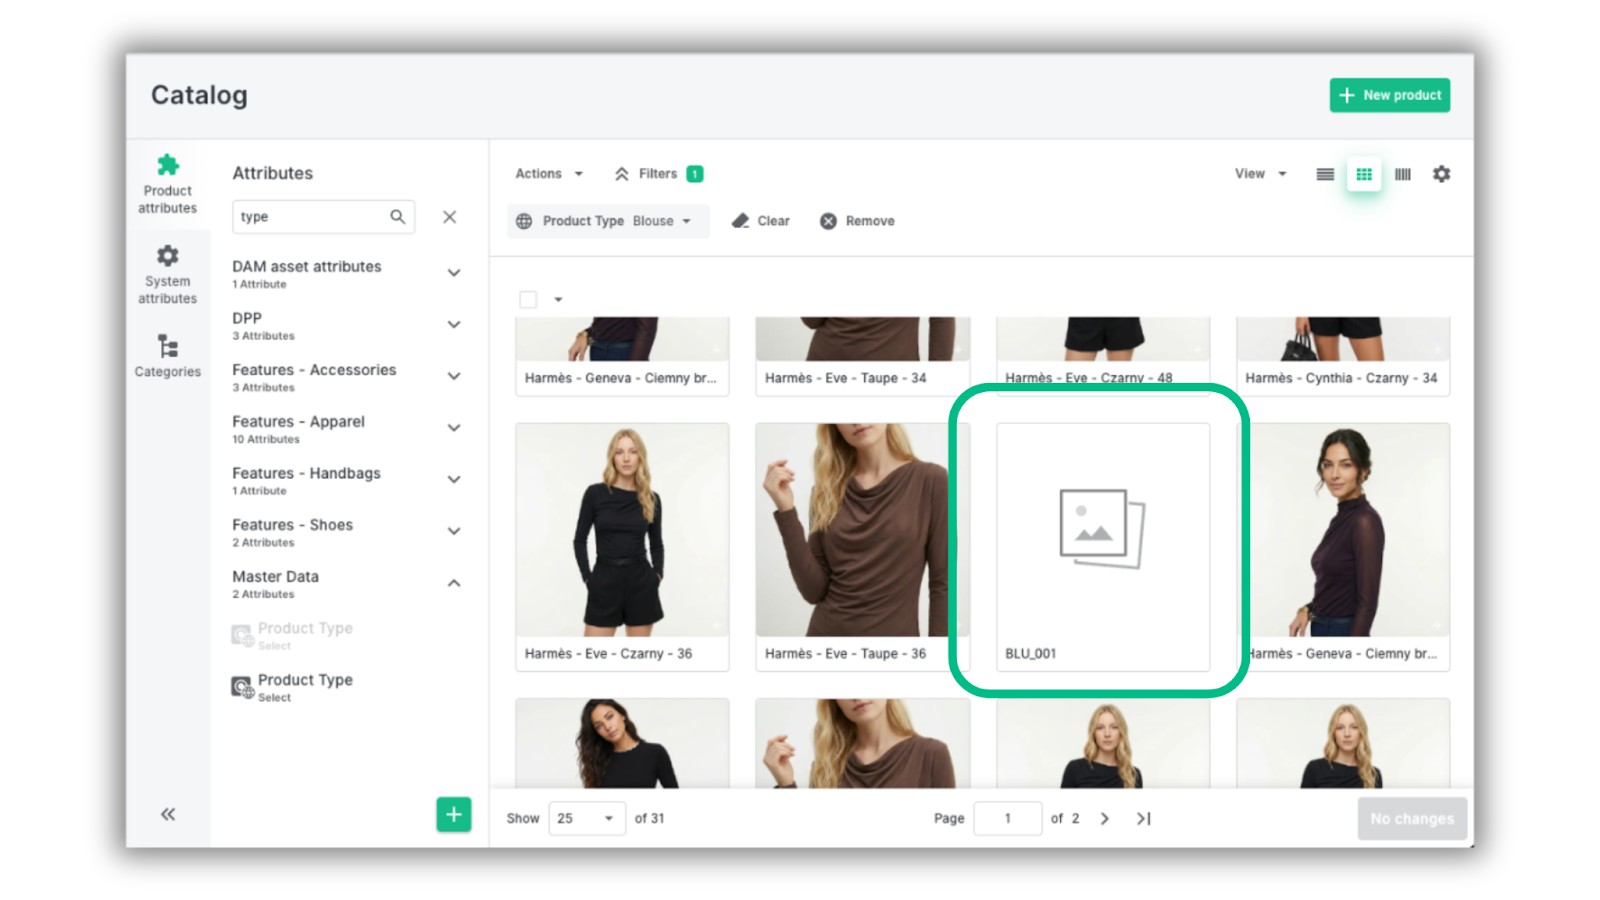
The first step is to search for the SKU and select all relevant images from the library in Media.
In our example, it’s four different files.
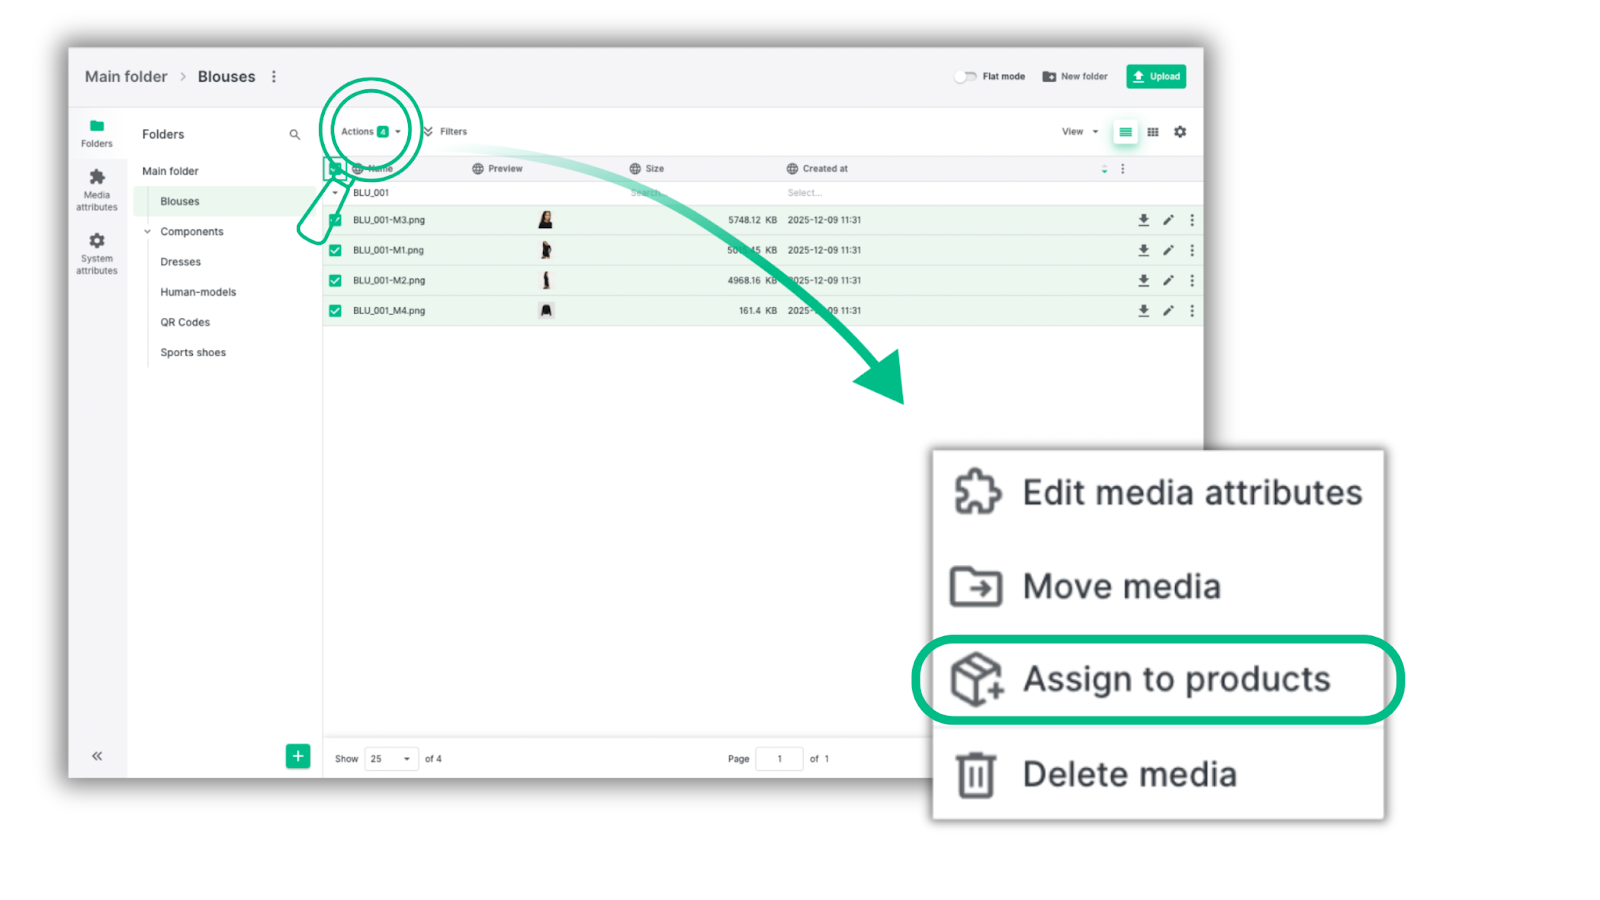
When you select all these images and click Actions → Assign to products, a configuration window will appear. There are several pieces of information that's required to enable the function. We will now review them.
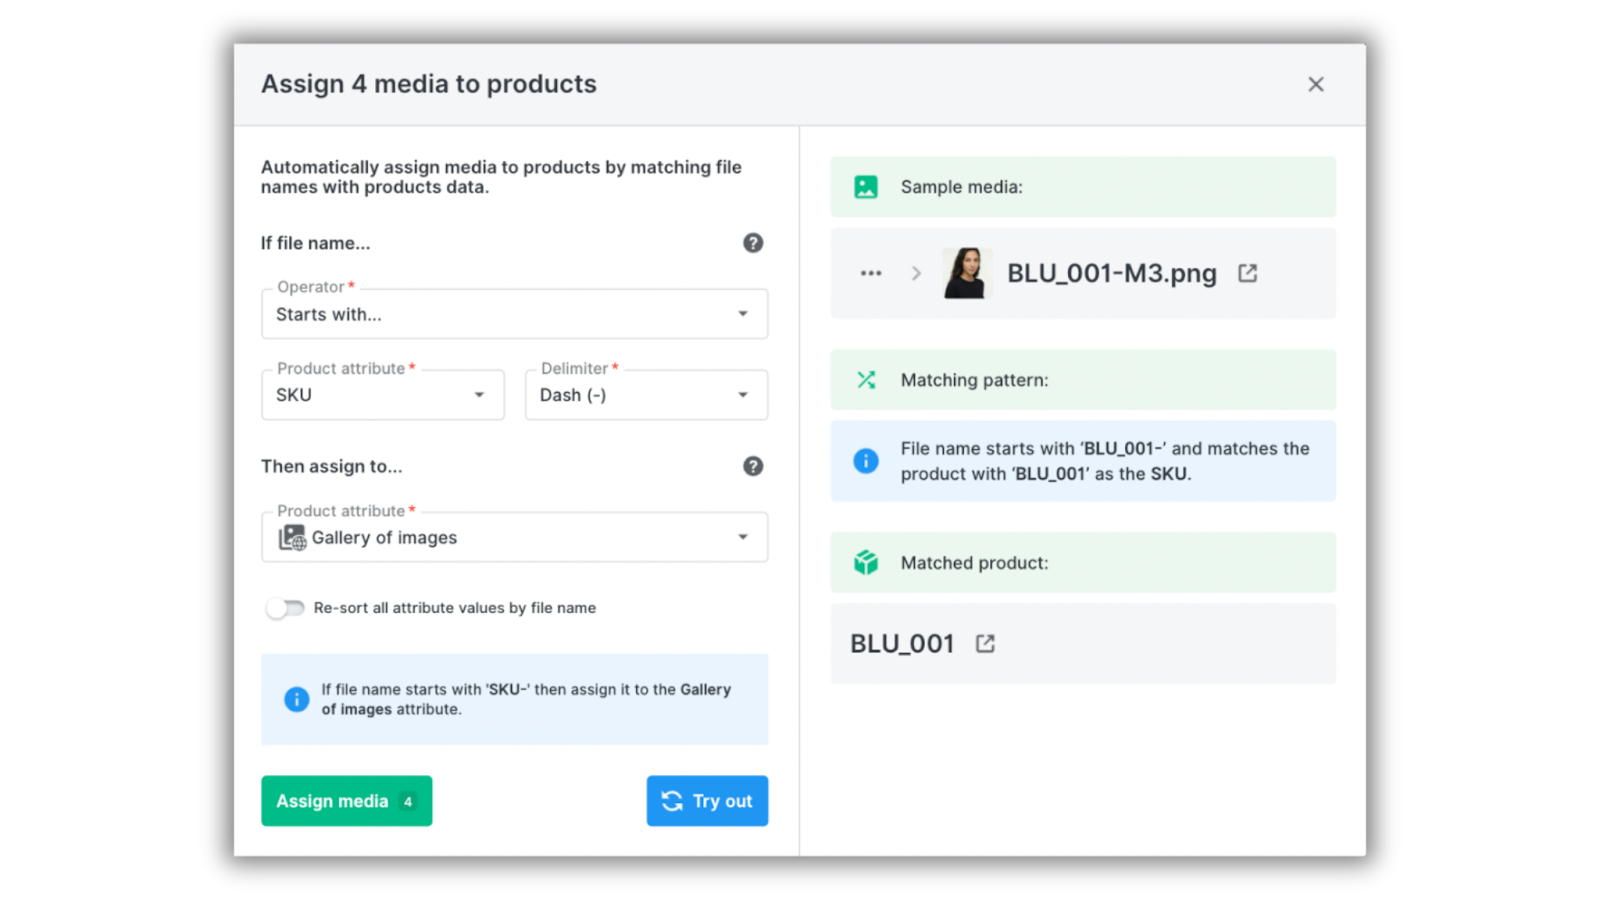
This tool assigns images to products based on a selected product attribute with a unique value, like SKU EAN or other product ID code.
The operator “Starts with” means the product attribute must begin with the specified text. The delimiter defines which character ends the sequence the system should match. In our case, the delimiter is “-”, following the example of the file name: BLU_001-M1.png.
Finally, choose the product attribute where the images should appear. We decided that all images should appear in the Gallery of Images.
In our example, the system will look for a product with the SKU “BLU_001”. If there’s an exact match in the catalog, all selected images will be assigned to the Gallery of Images.
Tip: Before running the action, you can use the “Try out” button to preview the results and confirm that the assignment will work correctly.
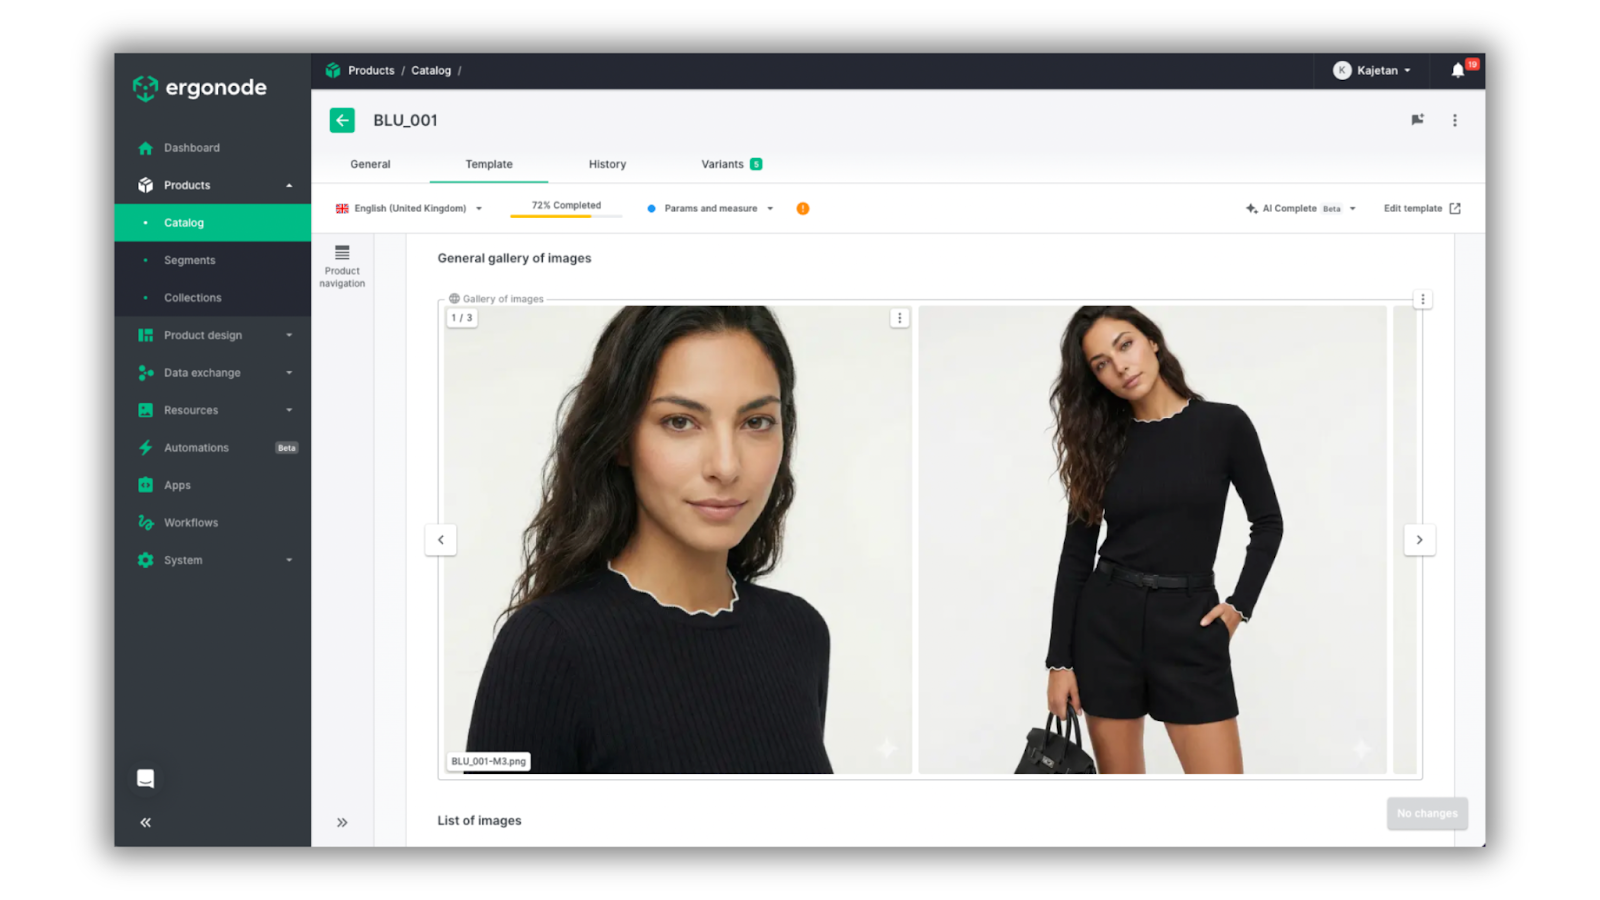
As shown in the screenshot above, the system successfully assigned the images to the BLU_001 product.
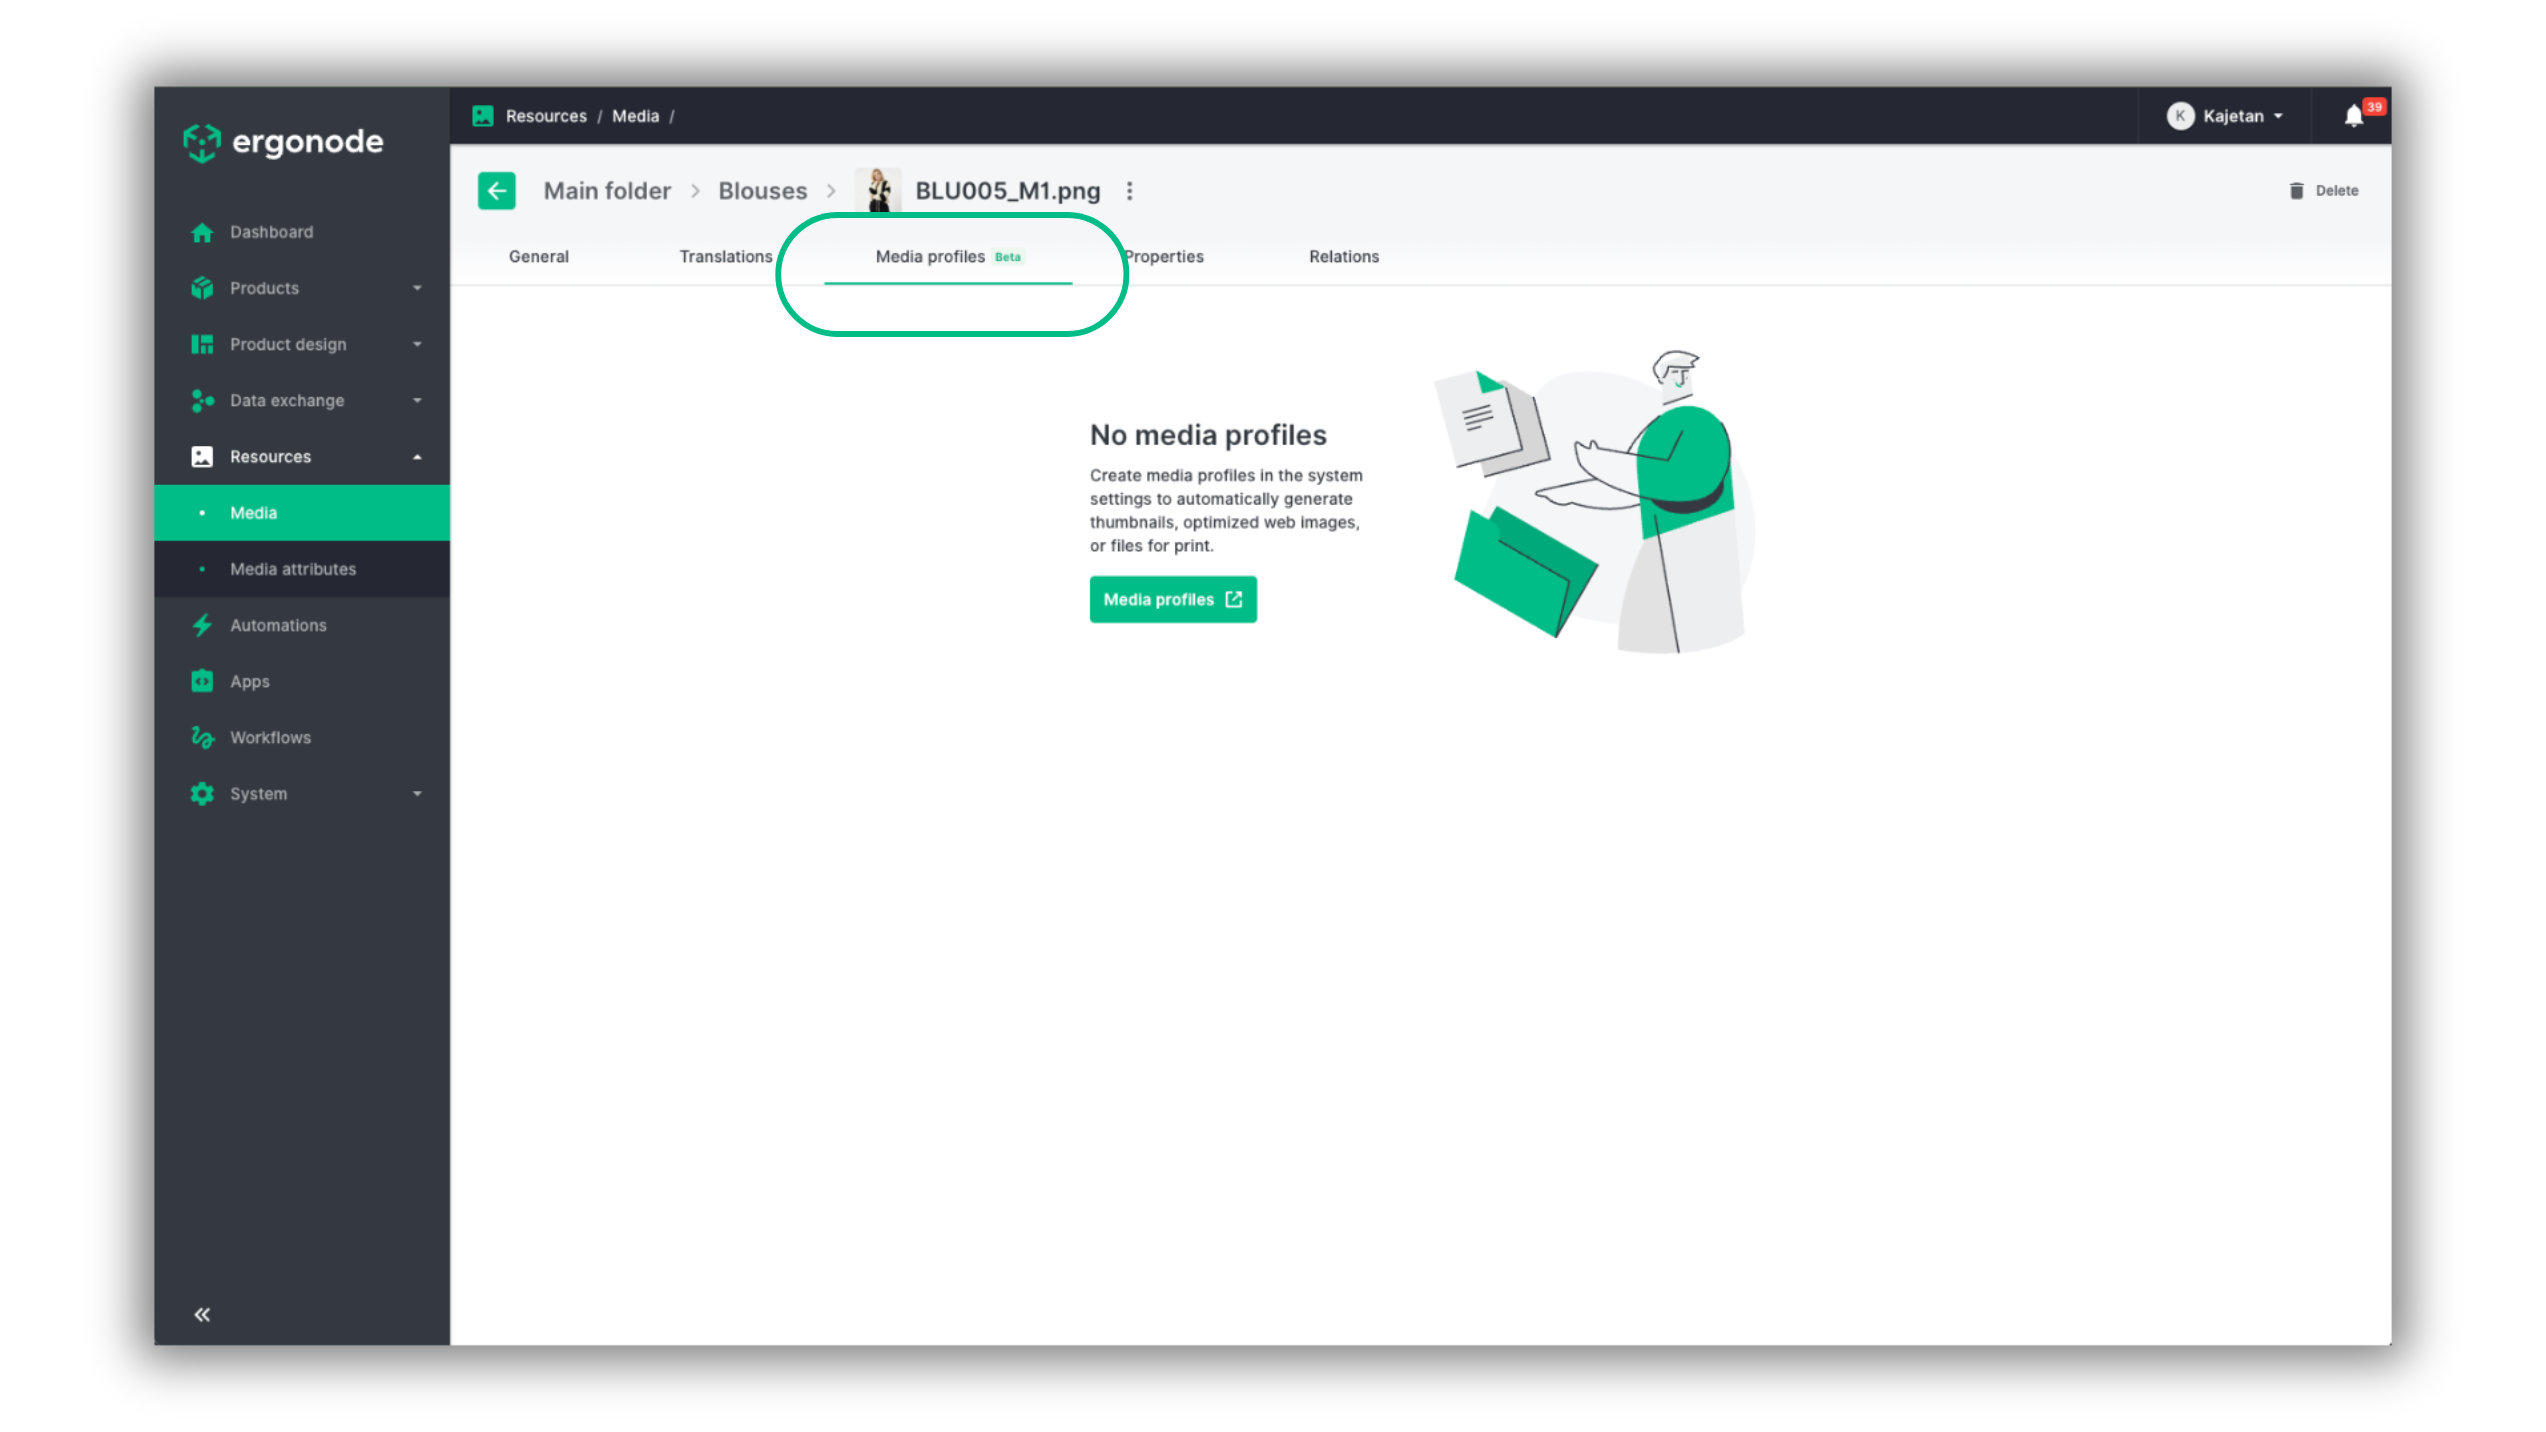
Creating media profiles
The transformation engine, as we call it internally, introduces new tools that help automate and optimize media processing — including the creation of media profiles. You can edit them in Settings.
Media profiles can also be accessed from any media file, take a look below.
Media profiles work like templates. Each profile stores a configuration that defines how an image should be processed.
Their primary goal is to adapt images for specific sales channels, so you no longer need to create 5 different images for 5 different sales channels.
With the new tool in Ergonode, upload one image and adjust it to work for all five channels automatically.
Each media profile includes:
- Name and code
- File format
- Color space
Once this basic setup is complete, you can configure additional parameters such as:
- New dimensions — specify the exact size required by the sales channel
- Resizing strategy — whether the image should fit within the required size or fill it
- Focus point — helps preserve the most important part of the image during cropping
- Fit-to-size — the image can be adjusted to fit a required size without cutting or refocusing it. The background can be transparent, or colored.
.png)
Tip: We’ll soon publish a dedicated guide explaining how to use media profiles in detail.
Other improvements and changes
Just like in Content Management Systems, each file now has its own shareable URL. You can copy the link, send it to teammates, and they can download the file instantly.
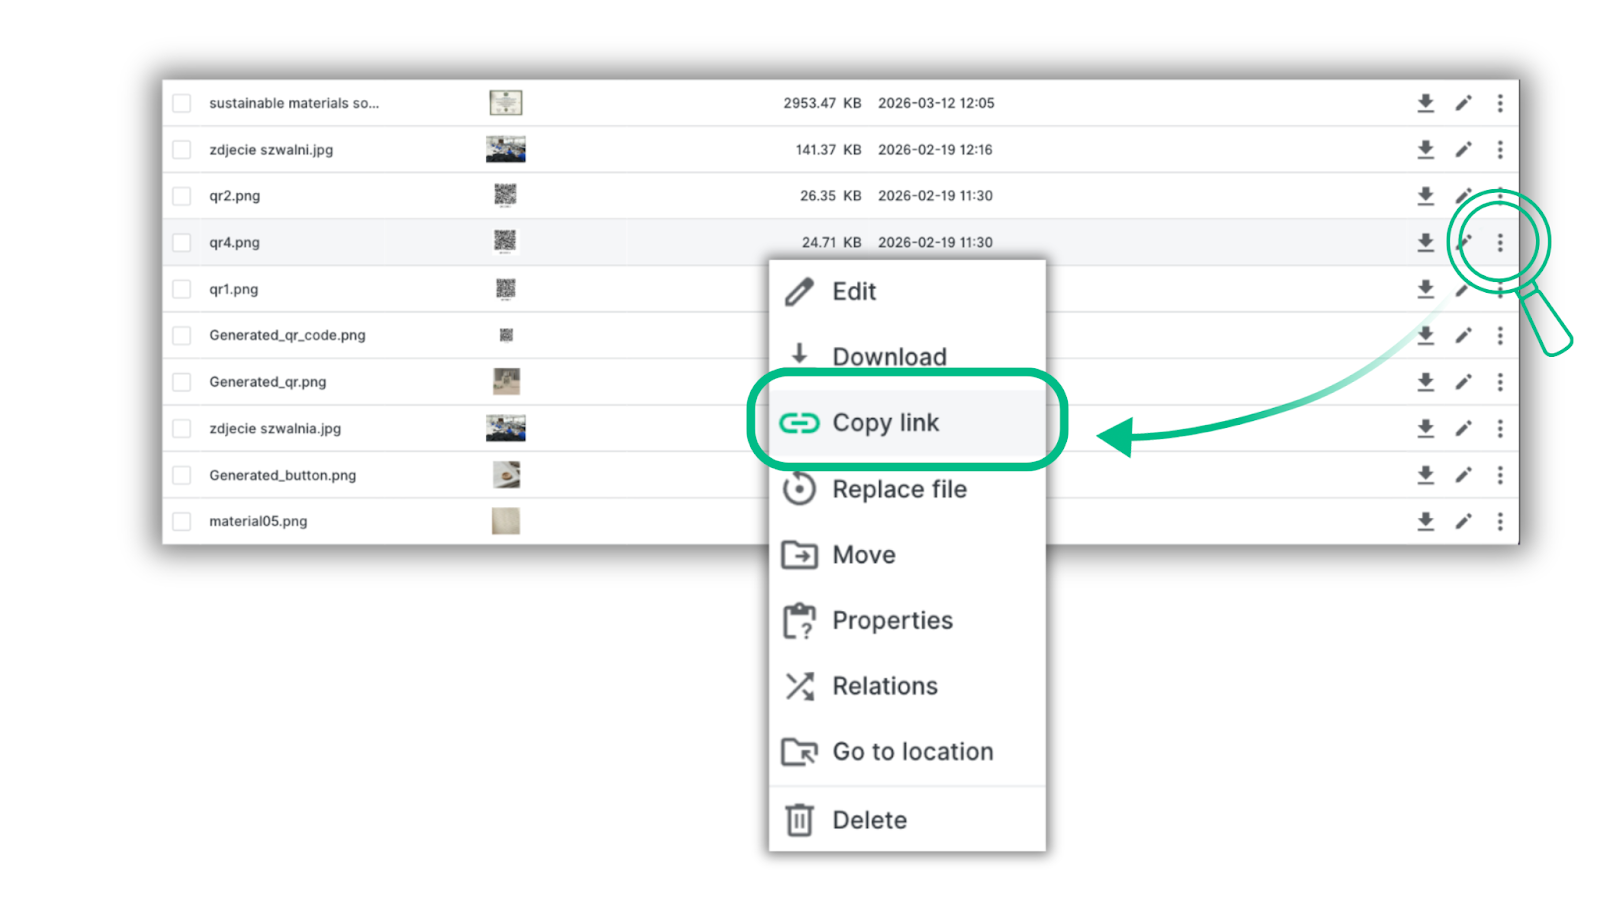
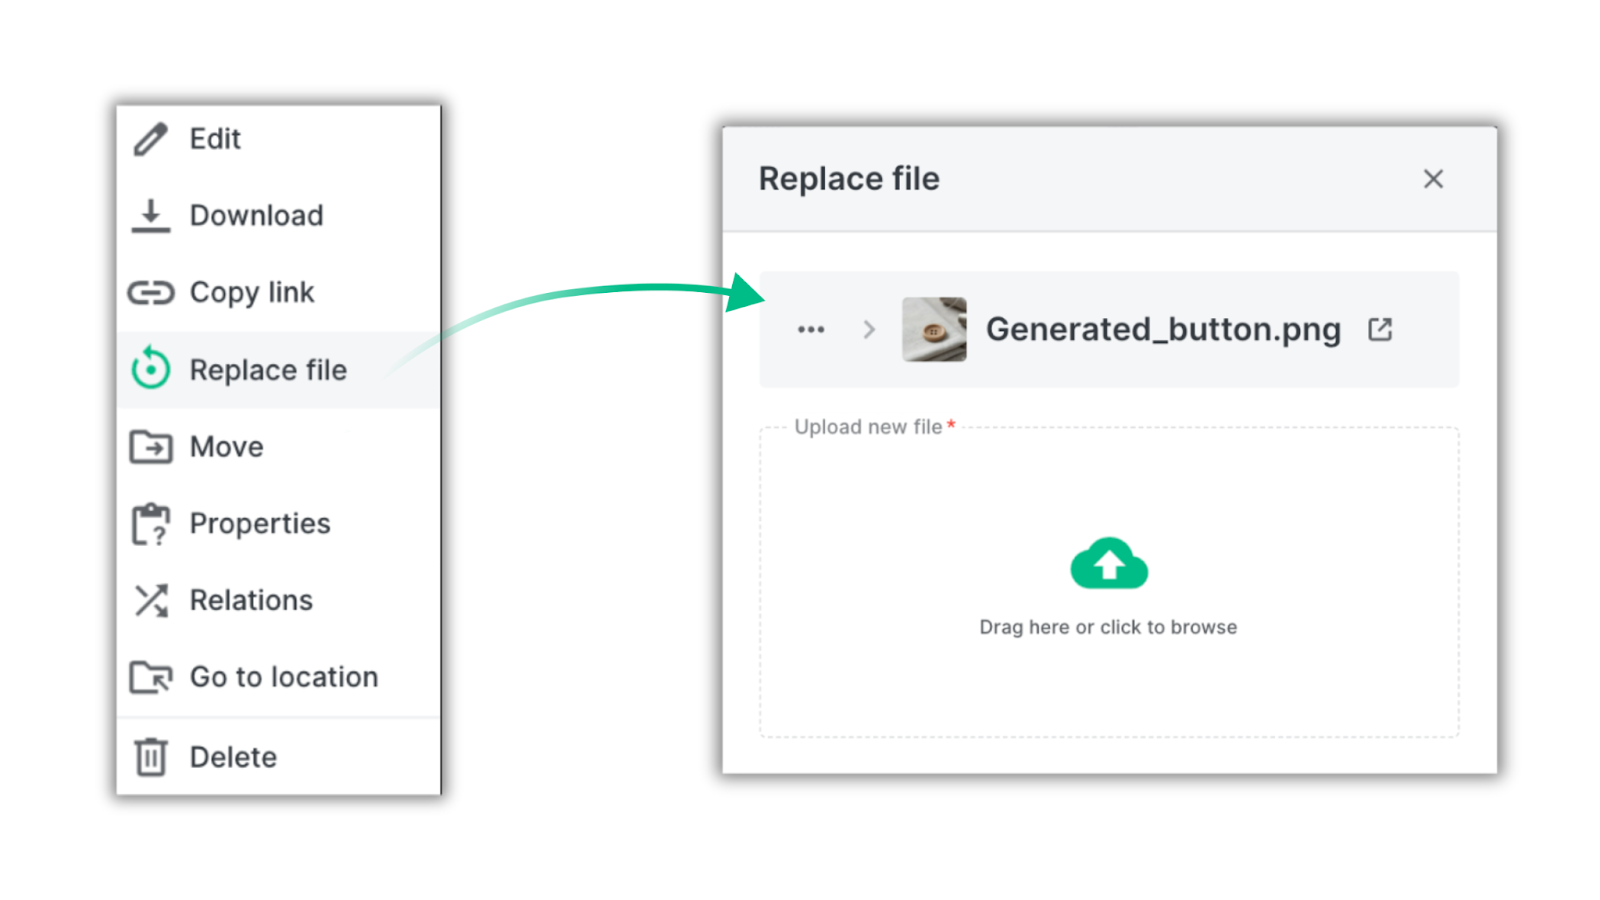
Files can also be replaced without losing their configuration.
For example, you can update a certificate file while keeping all existing relations intact - products, other media files, categories, custom fields and automations.
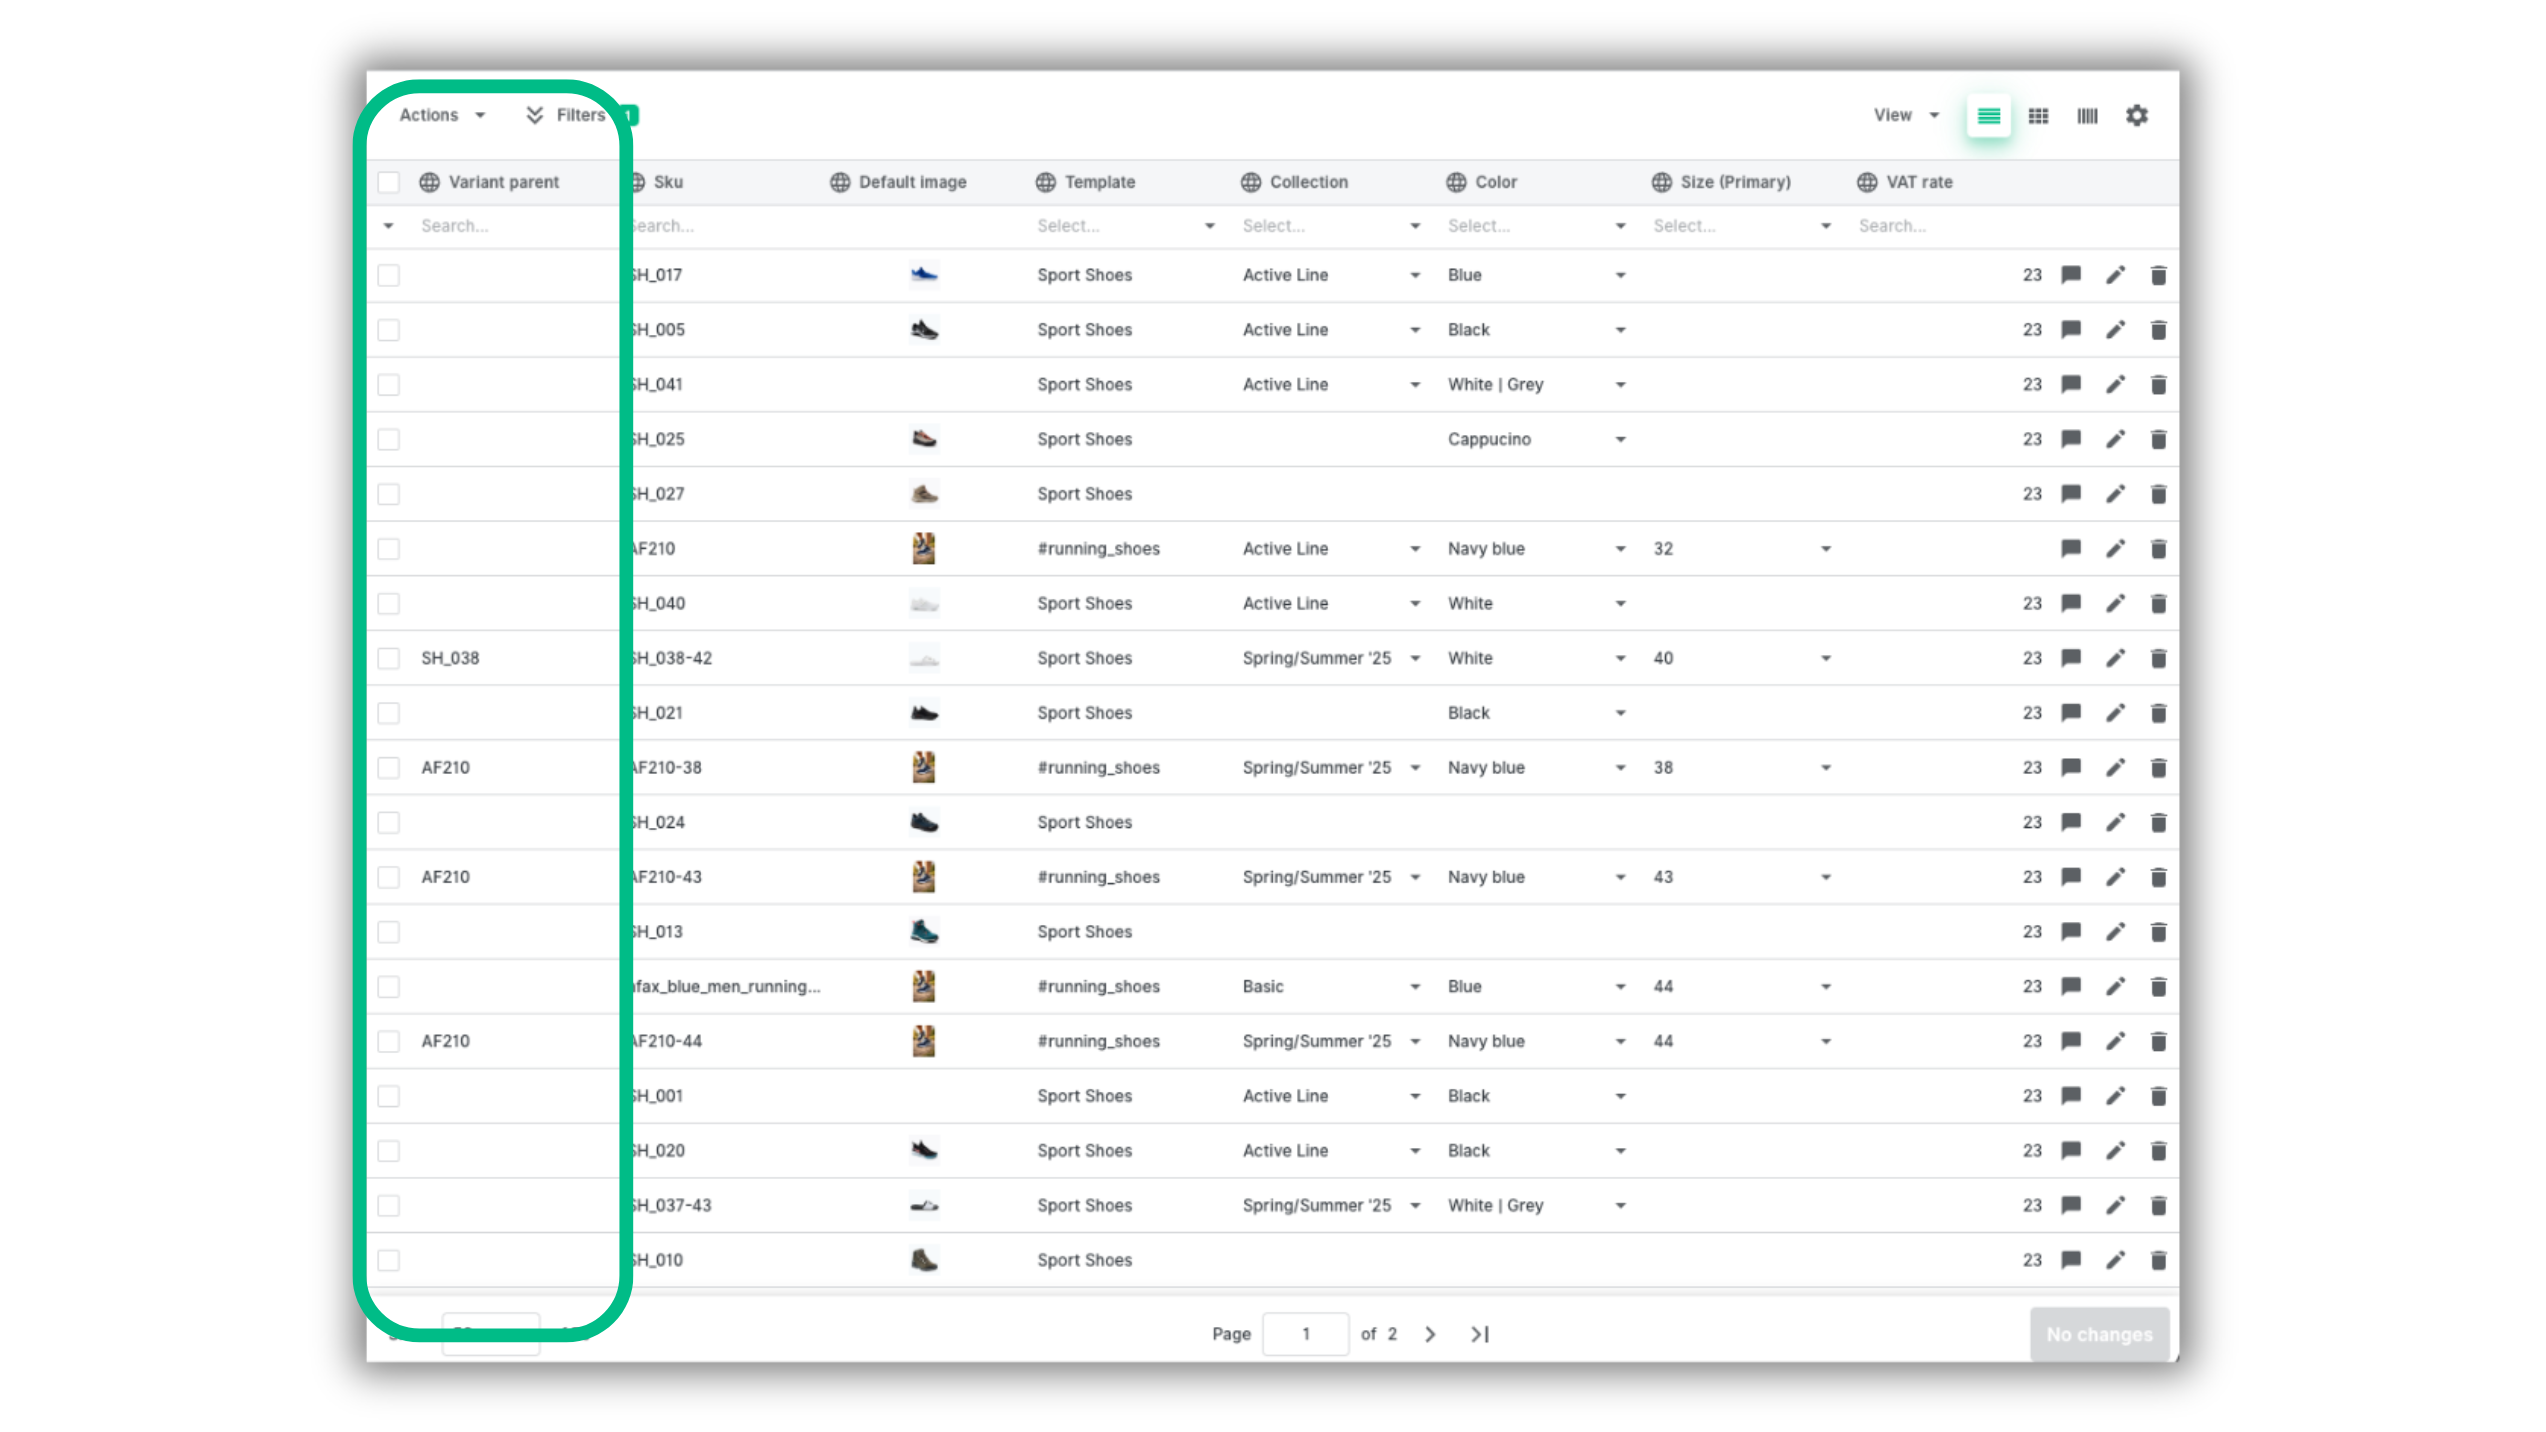
Variant parent — a new system attribute in the Catalog. With Variant parent available, you can easily track parent products for all variants by using it as a filter or a column. On top of that, you can easily filter all Variants of the Product with variants in the Catalog and perform batch actions on them.
This attribute also allows you to export parent product SKU, which is often a requirement for importing data into other systems. You can export this data via the Catalog export action or through the CSV app.
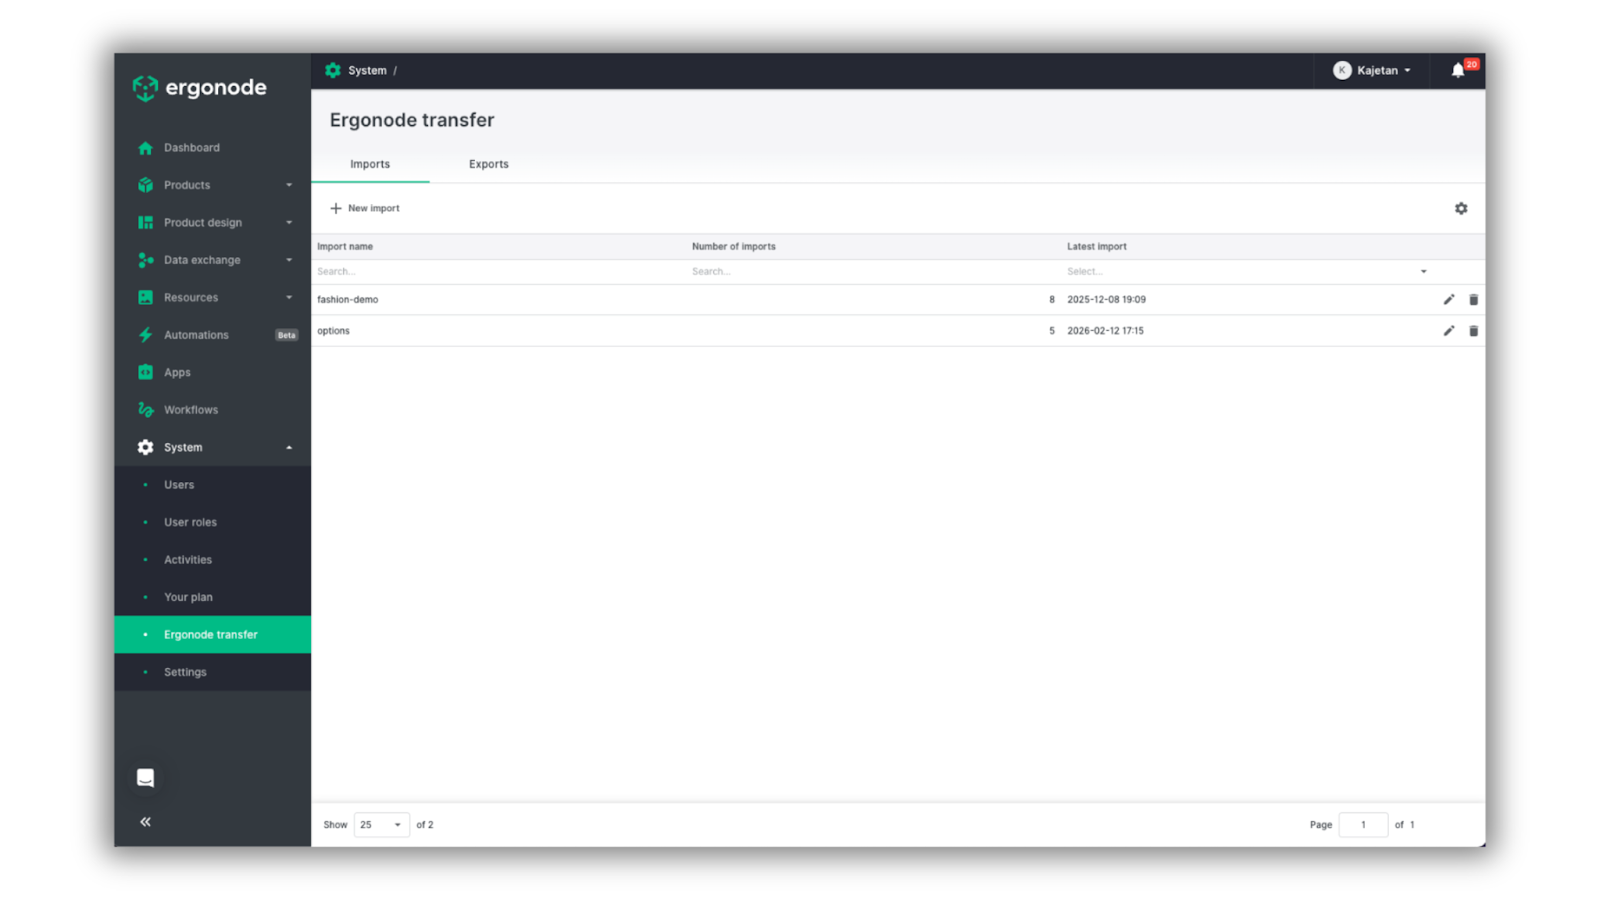
Improved Ergonode transfer with enhanced data security — we’ve significantly expanded Ergonode transfer capabilities. The tool now supports the import and export of additional system objects, including user roles, automations, attribute groups, and workflows. This makes it a comprehensive solution for environment-wide migrations and reliable data backups.
Security is our priority: from now on, Ergonode transfer strictly respects user permissions (CRUD). Users can only import or export data to which they have explicit access in the UI, ensuring much tighter data governance.
To reflect its broader role in system management, we’ve moved Ergonode transfer to the System section. This change helps separate high-level environment migrations from everyday product data updates.
Over to you
That’s it — the Advanced DAM features now available in Ergonode PIM, along with several additional improvements that came with this latest release.
We’d love to hear your thoughts about these changes. Stay tuned for the upcoming How-To guides, where we’ll take a deeper dive into individual features.